The room and the game
The panel on the right of the scene editor has three tabs. Object shows what you have selected on the canvas: see Layers and Objects. This page covers the other two:
- Room: the settings of the open room. They are saved in its
.scn. - Game: what every room of the project shares (the frame rate, the game variables and the controls), in
Scenes/Game.json. The controls are edited in their own window, Game controls.
What these two tabs generate in the code is in The code it generates.
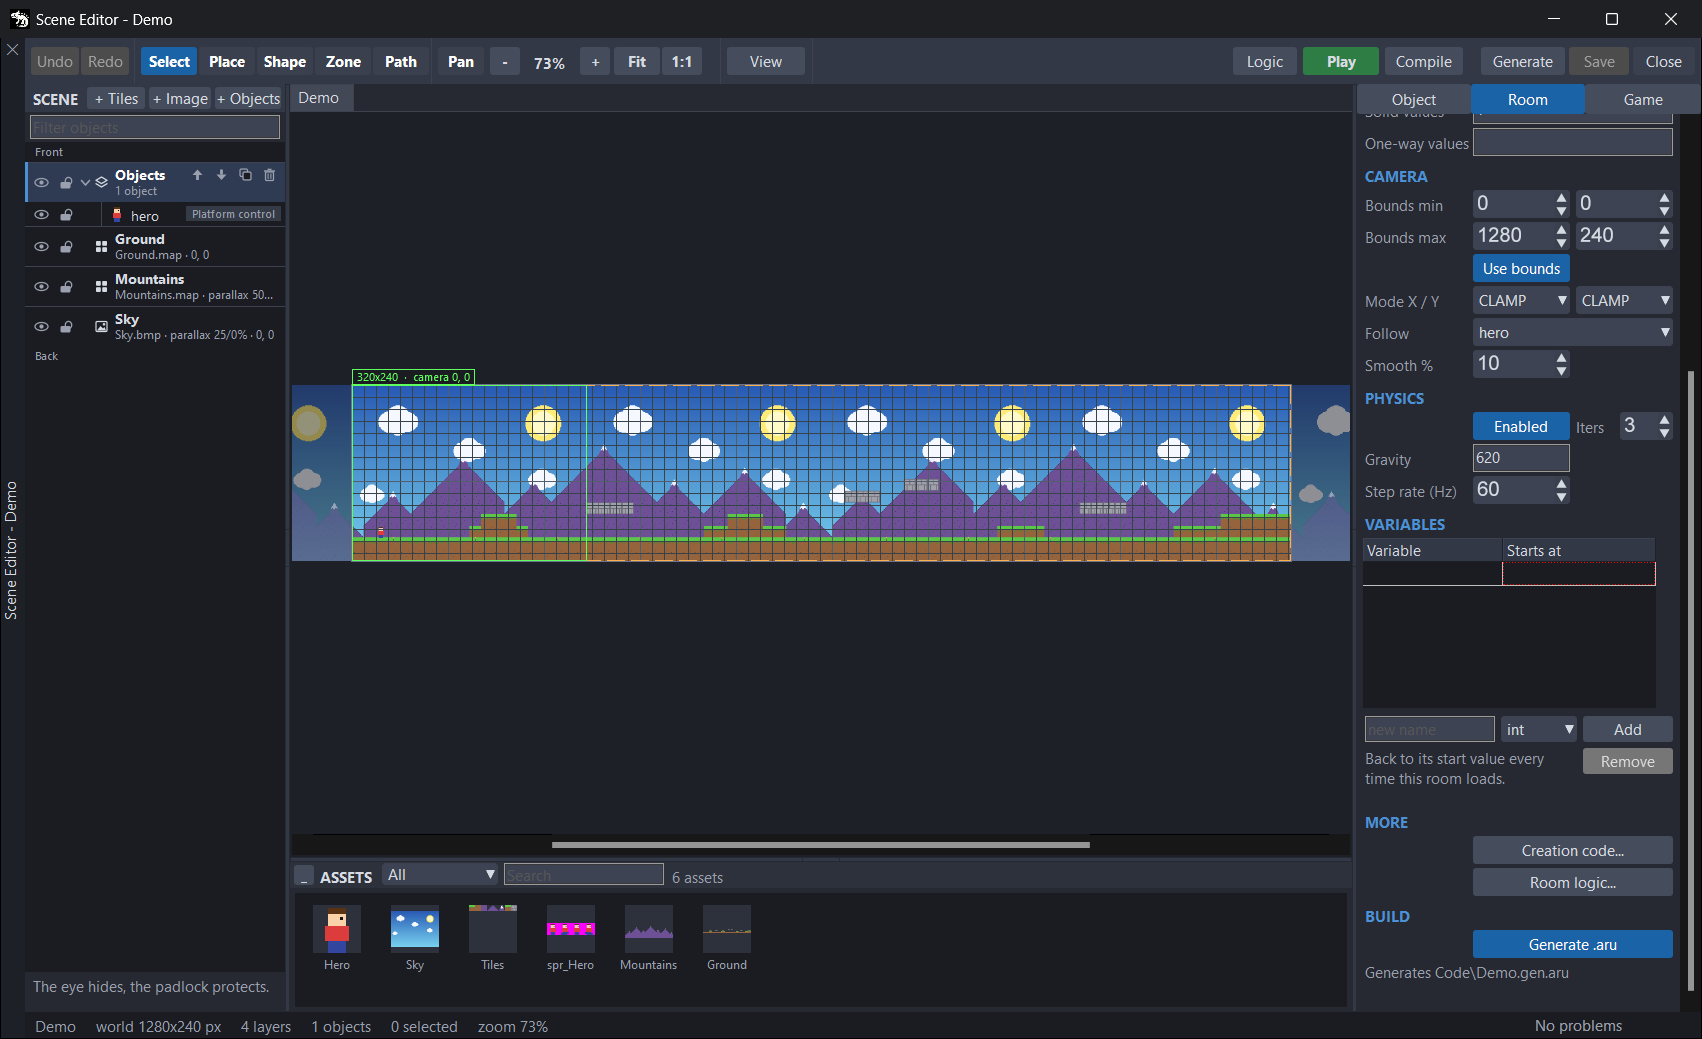
The Room tab
The Room tab has one section, ROOM. The data of the room is at the top, and below it come the groups CAMERA, PHYSICS, VARIABLES, MORE and BUILD.
The changes in this tab are undone with Ctrl+Z and saved with the room (Ctrl+S).
Name, size and screen
| Field | What it is | Default |
|---|---|---|
| Name | The name of the room. It is the prefix of everything its code declares (Level1Load, LEVEL1_TAG_…) and the name of its file. The line in BUILD tells which: Generates Code\Level1.gen.aru. | The name of the .scn file |
| Room (px) | Width and height of the room, in pixels. | 640 × 480 |
| Tile size | The size of a tile, in pixels. It is the cell the status bar points out and the size of a zone made with a single click. | 16 × 16 |
| Snap (px) | The grid objects snap to while you drag them. It only belongs to the editor: View › Snap to the grid turns it off, and so does holding Alt. | 16 × 16 |
| Screen (px) | The screen of the device: the green frame on the canvas. Set the size your game opens the screen with: it is used to work out how far the camera goes, and Play opens the screen at that size. | 320 × 240 |
| Background | The colour of the room on the canvas. Click the square to choose it. The game does not use it. | Black |
Accents, spaces and hyphens in the name change the prefix of the code: Your first game with rooms explains how. Give your rooms names without spaces or accents.
If you change Room (px) and the camera bounds were the whole room, the bounds follow the new size. Bounds you set by hand do not change.
A new room (New Scene in the explorer) copies the Room settings of the room you have open: the sizes, the background, the music, the collision values, the camera, the physics and Generate .aru. It does not copy the name, the collision map, whom the camera follows, the variables or the creation code.
Music
Music picks a piece of music from the project, or (no music). It plays from the start of the room, looping.
If a rule or a state of the room uses Play or stop music, they take over: the music in Music no longer plays by itself.
The sound only comes out after Sound.init(), on Windows too. The code of a room with sound already calls it when it loads the room.
Collision map
Collision map picks the tilemap that tells what is solid. That map is not drawn: it is only there to collide. It can be the same .map a tile layer paints, to collide with what you see, or another one. With no collision map, (no collision map), nothing collides with the tiles.
There are two ways to read it:
- By cell value, which is how it comes. Each cell of the map holds a number you set in the tilemap editor (Show Cell Values shows them). Solid values are the values that block on every side. One-way values are one-way platforms: you jump up through them from below and land on them from above.
- By tile number, with the Tile numbers button on. The fields are then called Solid tiles and One-way tiles, and what you type are tile numbers (Show Tile Numbers, in the tilemap editor, shows them). If a tile layer paints that same map, that layer is both the one you see and the one that collides.
The numbers are separated by commas, spaces or semicolons. When you leave the field, the editor writes them as 1, 2, 7 and drops whatever is not a whole number; the status bar says so. By default, Solid values is 1 and One-way values is 2. With an empty field, no value blocks that way.
The collision moves with the Offset (px) of the layer that paints its map, and with nothing else. If that layer has parallax, scrolls by itself or repeats (Wrap X, Wrap Y), what you see and what collides drift apart: the problems panel warns about it.
Camera
| Field | What it is | Default |
|---|---|---|
| Bounds min, Bounds max | The top-left and bottom-right corners of the area the camera may show, in pixels of the room. | The whole room |
| Use bounds | On, the camera shows nothing outside Bounds. Off, the camera has no bounds, and Mode X / Y does nothing. | On |
| Mode X / Y | What the camera does at the bounds, on each axis: CLAMP stops, FREE ignores them and WRAP comes back round. | CLAMP and CLAMP |
| Follow | The object the camera follows, or (free camera) for none. | (free camera) |
| Smooth % | How closely the camera follows the object: with 100 it sticks to it; with less, it trails behind and catches up little by little; with 0 it does not move. | 10 |
Bounds is the area the camera may show, not the position of the camera. The generated code does the maths: the corner of the camera goes from Bounds min to Bounds max minus the screen (Screen (px)). If the area is smaller than the screen, the camera stays centred. With WRAP, Bounds is the period: the camera comes back round every Bounds max − Bounds min pixels.
Follow only offers the named sprites of the object layers that are not decor (Decor). An object with no name cannot be followed. The problems panel warns if the followed object no longer exists or has no name, and if Smooth % is 0.
The camera follows the object when the game calls <Room>FollowCamera(room), once, after loading the room. That function only exists if Follow has an object: see The code it generates.
On the canvas, the green frame is the screen. Drag it by its label to see what the camera will show: it moves within the same bounds as in the game. View › Camera bounds draws the bounds with a dashed line, and View › Device screen hides the frame.
What the camera does in the game is explained on the page of the Scene module.
Physics
| Field | What it is | Default |
|---|---|---|
| Enabled | Turns on the physics world of the room. | Off |
| Iters | The solver iterations in each physics step, from 1 to 20: more is stiffer and slower. | 3 |
| Gravity | The gravity of the room, downwards, in pixels per second squared. It takes decimals with a point or a comma. | 500 |
| Step rate (Hz) | The physics steps per second, from 0 to 240. With 0 there is one step per frame, and on a fast PC that makes onGround() flicker and loses jumps. | 60 |
With Enabled off, the other three fields are greyed out and the room does not simulate bodies: the behaviours move the objects by changing their position. With physics on, they give them a velocity and the physics moves them.
The body of each object (Dynamic, Static…), its mass and its bounce are in Objects. With physics, the game frame rate (Rate (fps), in the Game tab) has to be 20 or more, or 0. And Step rate (Hz) should not go above 4 times that rate: each frame runs at most 4 physics steps, and with more the room runs in slow motion. The problems panel does not warn about it.
Room variables
The VARIABLES group is the list of the variables of the room, with their start value (Variable and Starts at).
- To create one: type the name in the new name box, pick the type (int, float, bool or string) and press Add. It starts at the zero of its type:
0,falseor the empty text. - To change its start value: type it in the Starts at column. If it is not of its type, the editor keeps the old one and the status bar says why.
- To change its type: select it in the list and change the type. If its value is not valid for the new type, it goes back to zero.
- To remove it: select it and press Remove.
As the panel says, they go back to their start value every time the room loads. Whatever has to carry over from one room to the next (the score, the lives) goes in the game variables, in the Game tab.
The behaviours and the rules of the room use them, picking them by name, and so does your code, as room.vars.name.
The name has plain letters (no accents), digits and _, does not start with a digit and cannot be a reserved word of JARU. The problems panel warns if two names give the same field in the code, if a start value is not of its type and if a room variable has the name of a game variable: the rules that name it would change the room one.
Creation code
MORE › Creation code... opens a window with the creation code of the room: JARU code of yours that runs once, at the end of <Room>Load. As the window says, the room is already built: you have room.scene, room.sprites, room.named, room.grids and the room variables.
The window works like the code editor of the IDE, with colours and autocompletion, also of room. and room.game.. What you type goes to the room when you close the window (Close) or leave it, and it is saved with the room.
It runs after the objects are created, and before the music of Music starts and the When the room starts rules run.
The creation code goes inside <Room>Load: a func you declare in it is local. The Call a function of yours action of a rule does not find it, and the game stops when the rule fires. Write those functions in a .aru of the project. The problems panel warns about it.
The code of each object is written in its own panel: see Objects. MORE › Room logic... opens the rules of the room: see Rules and states.
Generate .aru
BUILD › Generate .aru comes turned on: the Build writes the code of the room. Off, the Build skips it, saving it does not write its .gen.aru and Play does not play it. It is meant for a half-done room that your game does not use yet. More in The code it generates.
The Game tab
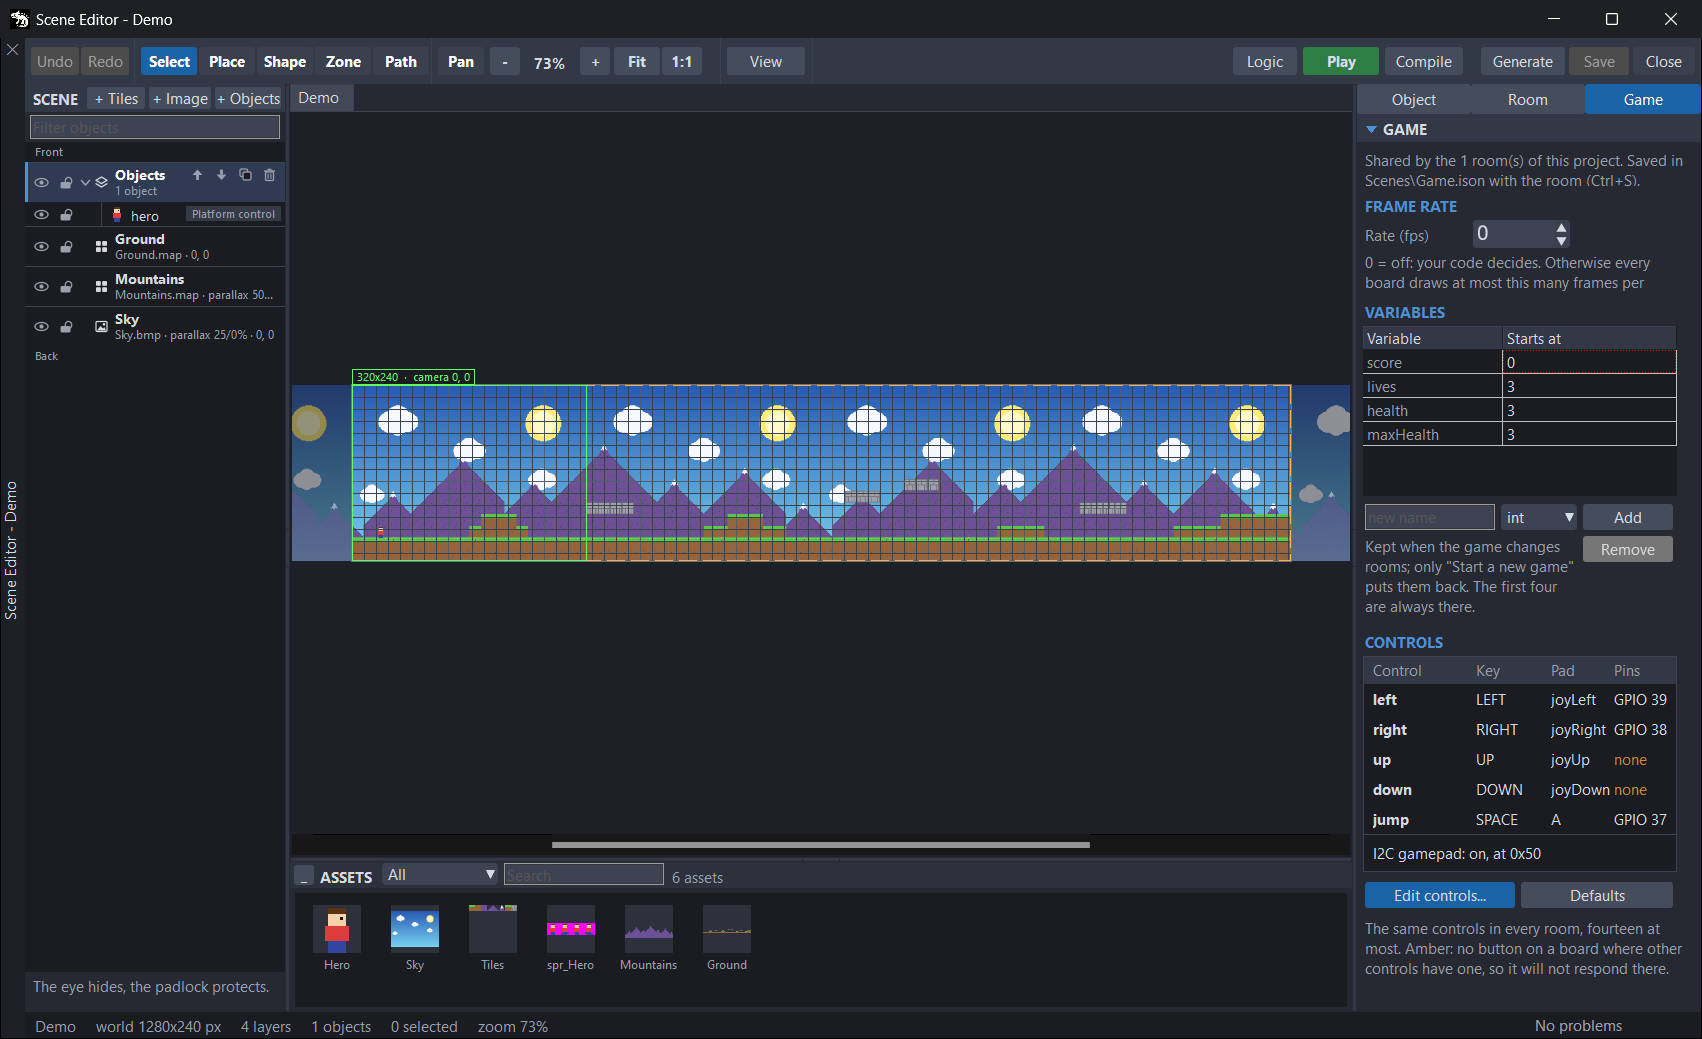
The Game tab has what every room of the project shares. You can edit it with no room open, as long as the project is open. There is no starting room: your code loads the first room.
- It is saved in
Scenes/Game.jsonwith the room: withCtrl+S, Save, Play, Generate and Compile. - While it has unsaved changes, the tab is called Game *.
- In this tab,
Ctrl+ZandCtrl+Yundo and redo the changes of the game, not those of the room. - A project with no
Game.jsonstarts with the four fixed variables and the five standard controls, or with the controls its rooms had if they come from an earlier version.
FRAME RATE
Rate (fps) is the rate of the whole game: how many frames per second it draws at most, from 0 to 120. It is Display.fps: Display.update() waits until the next frame is due.
- With 0, which is how it comes, your code decides.
- With any other value, the generated code sets
Display.fpsonce, when the game starts. Your code can change it later. - With physics, use 20 or more: below that the room runs in slow motion, because the physics simulates at most 0.05 s per frame. Without physics, 10 or more. The problems panel warns in both cases.
- On the ESP32-P4, 30 or 60 give a steadier motion.
VARIABLES
The game variables: the ones that carry over from one room to the next. As the panel says, they are kept when the game changes rooms, and only Start a new game puts them back to their start value (or SceneGameReset(), from your code).
The first four are always there and show in grey. They cannot be removed, renamed or change type: only their start value changes.
| Variable | Default | Who uses it |
|---|---|---|
score | 0 | The score. |
lives | 3 | The Lose a life action, which takes one away. |
health | 3 | The health. The Health behaviour can use it for the player, and Lose a life puts it back to its start value. |
maxHealth | 3 | The cap of health. |
health stays between 0 and maxHealth: the editor trims it when saving, and the rules when they change either of them. If your code changes them, call SceneGameClamp() afterwards.
Your own are created, changed and removed like the room ones, with the new name box, the type, Add and Remove.
In the code they are room.game.name in every room: room.game is the same object in all of them. Outside a room, they are sceneGame.name.
CONTROLS
The controls of the game: the same in every room, fourteen at most. The panel shows a summary, and they are edited in the Game controls window.
| Column | What it is |
|---|---|
| Control | The name of the control. |
| Key | Its key on Windows. |
| Pad | Its button on the I2C gamepad, or -. |
| Pins | Its GPIO on the boards. With one board family in use, the number (GPIO 37) or none; with several, on how many it has one (2 of 3). In amber if it lacks one on a board where other controls do have one: it will not respond there. |
The last line tells whether the I2C gamepad is on and at which address: I2C gamepad: on, at 0x50.
- Click a control, or Edit controls..., to open the Game controls window. A click on the gamepad line opens it too.
- Defaults puts back the five standard controls:
left,right,up,downandjump, with the keysLEFT,RIGHT,UP,DOWNandSPACE, with no pins and no gamepad buttons.
The Game controls window
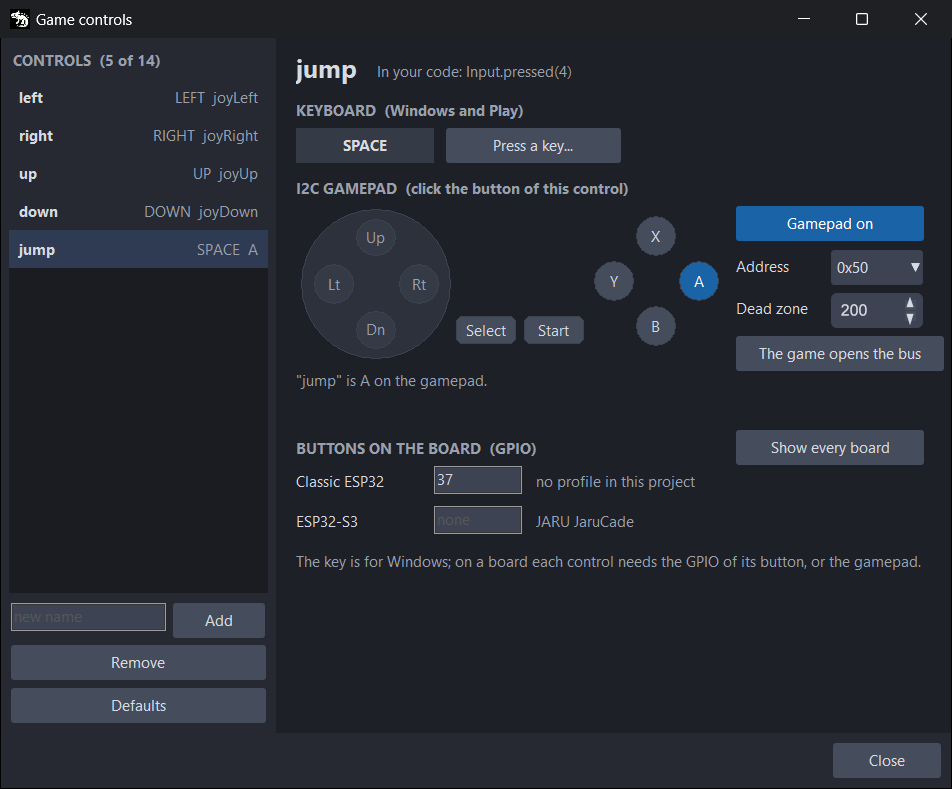
The Game controls window edits the controls of the game, one by one.
- On the left, the CONTROLS list, with how many there are out of the fourteen allowed (
5 of 14). Each row has the name, the key and the gamepad button.- To create one, type its name in new name and press Add. It starts with the key
SPACE, with no pins and no button. - Remove removes the selected one.
- Defaults puts back the five standard ones.
- To create one, type its name in new name and press Add. It starts with the key
- On the right, the selected control. Next to its name, its action number as your code reads it:
In your code: Input.pressed(4).
The changes go to the undo of the game: Ctrl+Z and Ctrl+Y work in the window. Esc or Close close it without losing what you typed. The game is saved with the room, with Ctrl+S in the editor.
The key
The KEYBOARD (Windows and Play) group holds the key of the control. Press Press a key... and then the key; Esc cancels. Only a key Input.map knows is accepted: the list is in the Input module.
The key is the one used on Windows and in the Play of the editor.
The pins of each board
The BUTTONS ON THE BOARD (GPIO) group holds the GPIO of the button of the control on each board family: Classic ESP32, ESP32-S3, ESP32-P4 and ESP32-S31.
- It shows the families of the boards of the project (the ones in Config › ESP32, with their names on the right) and those that already have a pin. Show every board shows all four.
- The GPIO is a number from 0 to 63. Empty, the control has no button on that board.
- The box turns amber if the control lacks the pin on a board where other controls have it: it will not respond there.
The I2C gamepad
The I2C GAMEPAD group is for the Adafruit Mini I2C Gamepad (seesaw, product 5743), the only one there is.
- The button of the control: click the drawing of the gamepad, on the button that drives it. A, B, X, Y, Start, Select and the joystick as four directions are available. A button drives a single control: the ones of other controls are grey, and clicking one moves it to this control. Clicking its own again removes it.
- Gamepad on / Gamepad off turns the gamepad on or off for the whole game. Off, nothing of the gamepad is generated and the buttons are ignored.
- Address is its I2C address:
0x50, or0x51to0x53if the A0 and A1 jumpers are cut. On the Waveshare S3 2.8, the clock of the board takes0x51. - Dead zone is how far the joystick moves from the centre before a direction counts: from 0 to 511, over a travel of 0 to 1023 with the centre at 512. By default, 200.
- The game opens the bus: turn it on if your code already calls
I2C.init, as happens on the ESP32-P4 for its audio codec. The generated code then does not open the bus: it only starts the gamepad.
The pins of the I2C bus come from the board profiles of the project (Config › ESP32, I2C Bus group): the gamepad starts on the boards whose profile has them. If your board's profile does not have them, it does not start on it, and the game says so on the console. On Windows and in Play there is no gamepad: the keys work.
With the gamepad on, the editor copies its driver to Code/Drivers the first time it generates the code. Each room reads the gamepad in its <Room>Update. Where no room runs (a title, an end screen) or in a room with no <Room>Update, call SceneInputRead() every frame.
How the controls reach the game
The controls are mapped by SceneInputMap(), a function of the generated code. Nothing calls it for you: your game calls it once, at start-up. Play does call it.
- On each board family with some pin, it maps the GPIO of each control and then starts the gamepad, if it is on.
- On a board with no pins, it starts the gamepad, if it is on: it is its only input.
- On Windows, it maps the keys.
- Your code reads each control with
Input.pressed(number), with the number the window shows.
If your game maps more actions with Input.map, use numbers no control has.
On a board with no controls
If on a board no control has a GPIO and the gamepad does not answer (or is off), the game starts with no input. The console of the board shows Controls: no GPIO buttons for this board in Game > Controls, so no input, or a similar notice if the gamepad is on.
This is because on the ESP32, the ESP32-S3 and the ESP32-P4 Input.map only takes a GPIO: with the name of a key, the game would stop at start-up. The ESP32-S31 does read keys, from a USB keyboard: if no control has a pin on it and the gamepad is off, it uses the Windows keys.
If the Build target (Target) is a board and no control responds on it, the problems panel warns about it.
What is saved
- The Room tab, in the
.scnof the room, in the Scenes folder. - The Game tab and the Game controls window, in
Scenes/Game.json. Only what has a value is written: the gamepad, if it is on; the frame rate, if it is not 0; and the pins and buttons of each control, if it has them.
{
  "version" : 1,
  "variables" : [
    { "name" : "score", "type" : "int", "value" : "0" },
    { "name" : "lives", "type" : "int", "value" : "3" },
    { "name" : "health", "type" : "int", "value" : "3" },
    { "name" : "maxHealth", "type" : "int", "value" : "3" },
    { "name" : "coins", "type" : "int", "value" : "0" }
  ],
  "gamepad" : { "enable" : true, "type" : "seesaw", "address" : 80, "deadZone" : 200, "openBus" : false },
  "fps" : 30,
  "controls" : [
    { "name" : "left", "id" : 0, "key" : "LEFT", "gpioEsp32" : 39, "pad" : "joyLeft" },
    { "name" : "jump", "id" : 4, "key" : "SPACE", "gpioEsp32" : 37, "pad" : "A" }
  ]
}
With the code
| In the editor | In your code |
|---|---|
| A room variable | room.vars.name |
| A game variable | room.game.name, or sceneGame.name |
| Start a new game | SceneGameReset() |
| The controls | SceneInputMap() once; then Input.pressed(number) |
| The camera following an object | <Room>FollowCamera(room), once |
| The physics, the camera and the sprites of the room | room.scene, a Scene |
Where each call goes and what else each room generates: The code it generates.
Known issues
- A room has two names. Name gives the name of its
.gen.aruand of its functions, and it is the one Ask for another room asks for with (this room). The name of the.scnfile is the one Ask for another room offers for the other rooms, the oneSceneLoadlooks for and the one Play follows when switching rooms. If you change one, the other does not follow: the.gen.aruwith the old name stays inCode, and the game keeps compiling it. Keep Name the same as the file name; if you change both, remove the old.gen.aru. - A
Game.jsonthat cannot be read (edited by hand, or with a git conflict) leaves the Game tab read only. The Build then generates the game without its controls or the variables you created, and does not warn: it compiles and responds to nothing. If the tab saysRead only, fix the file or get it back. - Every step of the Rate (fps) arrows is one undo step. Taking it from 0 to 60 with the arrow fills the undo history of the game. Type the number in the field.
- Defaults does not ask: it replaces the controls with the five standard ones and clears their pins and gamepad buttons. If you press it by mistake,
Ctrl+Z. - A name that starts with
_loses it in the code. A game variable_livesclashes withlives, and the generated code does not compile. Do not start variable names with_.