Sprite editor
The sprite editor turns an image of the project, the sheet, into an animated sprite: you cut the frames out of the sheet, put them in order and give the sprite its speed, its pivot and its collider. Its window is called Sprite Manager.
It edits .spr files, which usually live in the Sprites folder. A .spr holds no pixels: it says which image the frames come from and which rectangle of it each frame is. When you compile, the IDE exports each sprite to a .bmp and a .json, which is what Sprite.load loads.
There are three ways to open it:
- Double-click a
.sprin the explorer. - New Sprite, in the explorer menu (right-click) or in its button bar. It asks for the name, creates the
.sprinSprites, or in the folder you have selected in the explorer, and opens it. - Home › View › Sprites, on the ribbon: shows the editor with the sprites it already has open.
Each sprite opens in its own tab, named after the file. When you switch tabs, the editor saves the sprite you leave.

The window has four areas:
- On the left, where the frames come from: the sheet, the cut mode, the grid and the background color.
- In the middle, the sheet and, below it, the frame strip.
- On the right, the animation preview and what the sprite is: actor, animation, pivot, collider and export.
- At the bottom, the status bar: the sprite summary, the frame shown in the preview and the warnings.
A walkthrough
A walking character, from a sheet with its frames on a grid. The numbers are those of the Images/Sprites.bmp sheet in JaruQuest: 16 × 16 pixel frames on a magenta background.
- Create the sprite. In the explorer, right-click › New Sprite. Type the name, for example
Walk, and accept: the IDE createsSprites/Walk.sprand opens it in the editor. - Choose the sheet. Open SOURCE SHEET and pick the image. The editor fits it in the view and takes as background color the one that appears most along the edge of the sheet, magenta here: it shows up under BACKGROUND.
- Remove the background. Tick Remove background: magenta becomes transparent, in the preview and in the game.
- Set the grid. Leave CUT MODE on Grid and set Cell W and Cell H to 16.
- Cut the frames. Click the cells in animation order: each click adds a frame at the end of the strip, below the sheet. For several cells in a row, drag over them; for the whole sheet, Cut All.
- Watch the animation. Press play (▶) below the preview, or
Space, and set FPS, for example to 6. - Set the pivot. For a character that walks on the floor, Feet: the bottom center point. If it is going to collide, Fit to content fits the collider to the drawing.
- Save with Save (
Ctrl+S). While there are unsaved changes, the button reads Save ●. - Use it in the game. When you compile, the IDE exports the sprite. In code you load it with
Sprite.load("Sprites/Walk.spr"): see "From code" further down. In a game with rooms, put it on an object in the scene editor.
Tools
The top bar:
| Button | What it does | Key |
|---|---|---|
| New Sprite | Asks for a name and creates a sprite in the Sprites folder, in a new tab. | — |
| Save | Saves the sprite of the tab. With unsaved changes it reads Save ●. | Ctrl+S |
| Close | Closes the tab. If there are unsaved changes, it asks whether to save them. | — |
| Undo and Redo | Undo and redo. | Ctrl+Z and Ctrl+Y |
| Cut All | Cuts the whole sheet at once (see "Cut All" below). | — |
| - and + | Zoom the sheet out and in, from 25 % to 3200 %. The zoom shows between them. | - and + |
| 1:1 | Zoom to 100 %. | Ctrl+0 |
| Fit | Fits the sheet in the view. | Ctrl+9 |
New Sprite does the same as the explorer's, with two differences: it always creates in Sprites, and it does not warn if the name already exists (see Known issues). Both give the new sprite the sheet, the background color and Remove background of the sprite you had open, and start it at 8 FPS.
Undo and Redo:
- Each click that cuts is one step. A batch (the marquee or Cut All) is a single one, as is dragging the pivot or the collider from press to release.
- They keep up to 64 steps, those of the tab you are in. The history is cleared when you switch tabs, because the sprite is read from disk again.
- They don't undo choosing the sheet, nor what is not saved with the sprite: Offset X, Offset Y, CUT MODE, the zoom, Checker and Onion skin.
Cutting the sheet
The sheet
SOURCE SHEET lists the images of the project. When you pick a different one, the editor fits it in the view and takes as background color the one that appears most along its edge.
Frames are rectangles of the sheet, with their coordinates. If you change the drawing on the sheet in the image editor, the frames change with it. But if you crop it or resize it, they point somewhere else, and the editor warns about it in the status bar.
Grid
With CUT MODE set to Grid, the sheet shows a grid on top, and the cell under the mouse gets a red frame.
| Field | What it is |
|---|---|
| Cell W, Cell H | The width and height of a cell, in pixels. 16 by default. |
| Offset X, Offset Y | Where the first cell starts, in pixels from the top left corner of the sheet. |
| Spacing X, Spacing Y | The pixels between one cell and the next, for sheets with a border around each drawing. |
- A click on a cell adds it as a frame, at the end of the strip. Only cells that fit entirely inside the sheet count; a click on the gap between two cells does nothing. If you click the same cell twice, the frame is added twice.
- Dragging over the sheet draws a yellow rectangle. When you release, every cell it touches is added, row by row, except those already cut.
Cell W, Cell H, Spacing X and Spacing Y are saved with the sprite. Offset X, Offset Y and CUT MODE are not: when you open the sprite again, they go back to 0 and Grid.
Auto
With Auto, a click on a drawing in the sheet cuts the tight rectangle around it. The editor follows the pixels that touch each other, diagonally too, and that are not the background color. The last detected rectangle is shown in red. A click on the background color cuts nothing.
It is meant for sheets without a grid, with drawings of different sizes. Two drawings that touch come out as a single frame: that sheet needs Grid. And a drawing with loose parts comes out as several.
Cut All
Cut All cuts the whole sheet at once, depending on CUT MODE:
- With Grid, every cell that has something other than the background color.
- With Auto, every drawing on the sheet, in reading order: by rows, top to bottom, and within each row left to right.
It skips what was already cut, and it is a single undo step. The Output says how many frames it added, or why it found none.
The background color
The background color is what the editor counts as empty: for Auto and Cut All, for Fit to content and for Trim sheet. You change it under BACKGROUND:
- The eyedropper: press it and click on the sheet. The color of that pixel becomes the background.
- The swatch: click it to choose the color in a color dialog.
- Next to them is the color code, as
$RRGGBB.
Remove background makes that color transparent: in the strip and in the preview, where a checkerboard shows behind it, and in the game, because the Build exports it as the transparent color. Checker, under VIEW, is the size of the squares of that checkerboard in the preview.
Onion skin
With Onion skin and Grid mode, the cell under the mouse shows, in blue, the silhouette of the last frame of the strip. That way you see before clicking whether the drawing in the cell sits in the same place as the previous one. It is only a viewing aid: it is not saved.
The frames
The strip below the sheet has the frames in animation order, with their numbers. A blue bar marks the one the preview is showing.
- Click: shows that frame in the preview and stops the animation.
Ctrl+click marks or unmarks a frame, andShift+click marks the run from the last one you clicked. Marked frames get a blue frame.- Dragging a frame moves it. A white line shows where it will land.
Deleteremoves the marked frames.- Right-click opens a menu that acts on the marked frames (if you click on an unmarked one, on that one):
- Duplicate frame, with a single frame marked, puts a copy right after it. It is for repeating a drawing in the animation: a pause, a blink.
- Delete frame removes them. With several marked it says how many: Delete 3 frames.
- Reverse order reverses the whole strip.
- Select all marks them all.
- Double-click: opens the sheet in the image editor.
The status bar says:
- On the left, how many frames there are, the size they are exported at and how much they take in the board's memory, at 2 bytes per pixel: "17 frames · 24x24 · ~19.1 KB on board (16 bpp)".
- In the middle, the frame in the preview: "3/17 24x24 @48,24" is the third of 17, 24 × 24 pixels, cut at point (48, 24) of the sheet.
- On the right, in bold, the first warning and how many more there are. Hovering shows them all, and when the sprite opens the Output lists them.
The warnings:
- The sheet has changed size since the frames were cut: they may all point somewhere else.
- Some frames fall outside the sheet. They are drawn gray.
- The actor or the pose is not valid (see "Actors and poses").
- The frames are not all the same size. The Build puts each one in a slot the size of the largest, and the warning says how much is spent on padding. The summary says it too: "[frames of different sizes: padded]".
The animation
Under ANIMATION:
- FPS: frames per second, from 0 to 120. With 0, the sprite doesn't animate by itself in the game, and you choose the frame with
sprite.frame; the preview plays it at 15. - Sprite Align (Top, Center, Bottom): where each frame goes, vertically, inside the common slot when they are not all the same size. Horizontally they are always centered. With all frames the same size it changes nothing.
- Loop and Ping-pong: how the animation repeats in the game. They are
sprite.loopandsprite.yoyo.
| Loop | Ping-pong | In the game |
|---|---|---|
| Yes | No | When it ends it goes back to the first frame. This is the default. |
| Yes or no | Yes | It goes back and forth without stopping. Loop doesn't count. |
| No | No | It plays once. When it goes past the last frame, the sprite becomes active = false: it stops being drawn and colliding. |
The preview ignores Loop and Ping-pong: it always repeats the animation forwards.
Below the preview is the playback bar: previous frame (|<), play (▶), next frame (>|) and stop (■). From the last frame it goes to the first, and the other way round. Space plays or stops, and ← and → change frame.
Pivot and collider
Both are always drawn over the preview, and you drag them right there. You can also type them under PIVOT and COLLIDER, and right-clicking the preview opens a menu with the usual values.
Their coordinates are those of the slot the Build exports, the dashed gray rectangle: the largest width by the largest height of the frames, with each frame placed according to Sprite Align. It is the rectangle the VM gets.
If the pivot and a collider handle overlap, you grab the one you touched last.
The pivot
The pivot is the point of the sprite that lands on its x and y in the game, and the one it rotates around (sprite.pivot). It is the orange cross.
Untouched, it is the default one, the center of the slot: "default · center" next to PIVOT says so. If the frames change, it stays in the center.
- Drag it, or type X and Y, and it becomes the sprite's own: it stays at those coordinates even if the frames change, and even if they are the center's.
- Center goes back to the default.
- Feet puts it at the bottom center: the usual one for a character that walks on the floor.
- Corner puts it in the top left corner.
The pivot can lie outside the slot.
The collider
The collider is the shape the sprite collides with. It is the light blue line, with a handle on each corner of the rectangle or on the edge of the circle.
Untouched, it is the default one, the rectangle of the whole slot: it is drawn dashed, with "default · whole frame" next to COLLIDER. If the frames change, it is still the whole slot.
- Rect and Circle choose the shape. When you change shape, the collider fits itself to the drawing.
- X and Y are the top left corner of the rectangle, or the center of the circle. W and H are the size of the rectangle, and R, the radius of the circle.
- Dragging it from inside moves it, and dragging its handles resizes it. It doesn't leave the slot. The default one doesn't move, but it does stretch from its corners.
- Typing a number or dragging it makes it the sprite's own: it stays as you leave it even if the frames change.
- Whole frame goes back to the default.
- Fit to content fits it to the drawing of all the frames, with no air around it. The circle stays inside the drawing. With an actor, it covers all its poses (see "Actors and poses").
Below it says "Only used by objects with a body, or by hits()": the collider only counts for sprites with a body (bodyType) and for hits().
The right-click menu on the preview has Pivot: center, Pivot: feet (bottom center) and Pivot: top left, which are Center, Feet and Corner, and Collider: whole frame (default), Collider: rectangle fit to content and Collider: circle fit to content.
Trim sheet
Under EXPORT, Trim sheet trims the air of the sheet when exporting: the background color left over around the drawing of all the frames. It takes the same off every frame, so the animation doesn't wobble. Next to it, the editor says how much it would save on the board ("would save ~1.6 KB", when it is over 1 KB), or "trimmed" if it is already ticked.
In the editor, the pivot and the collider are still shown on the untrimmed slot. The Build moves them so the sprite stays in the same place in the game. But the exported sprite is smaller: sprite.width and sprite.height give the trimmed size, and with the default collider, the one in the game is the trimmed slot.
Actors and poses
An actor groups the sprites of one character. Each one is a pose: idle, walk, jump… Poses are normal sprites, each with its own .spr, frames, pivot and collider. What groups them is a label: the name of the actor, written in all of them.
You don't create the actor anywhere: it is enough for several sprites to have the same name in Actor. The label doesn't change what is exported, but it is used for three things:
- the editor shows the actor's poses together, to go from one to another and line them up;
- the explorer's Filter box also finds sprites by their actor;
- the IDE writes
Code/Actors.gen.aru, with a function that loads all the poses of each actor.
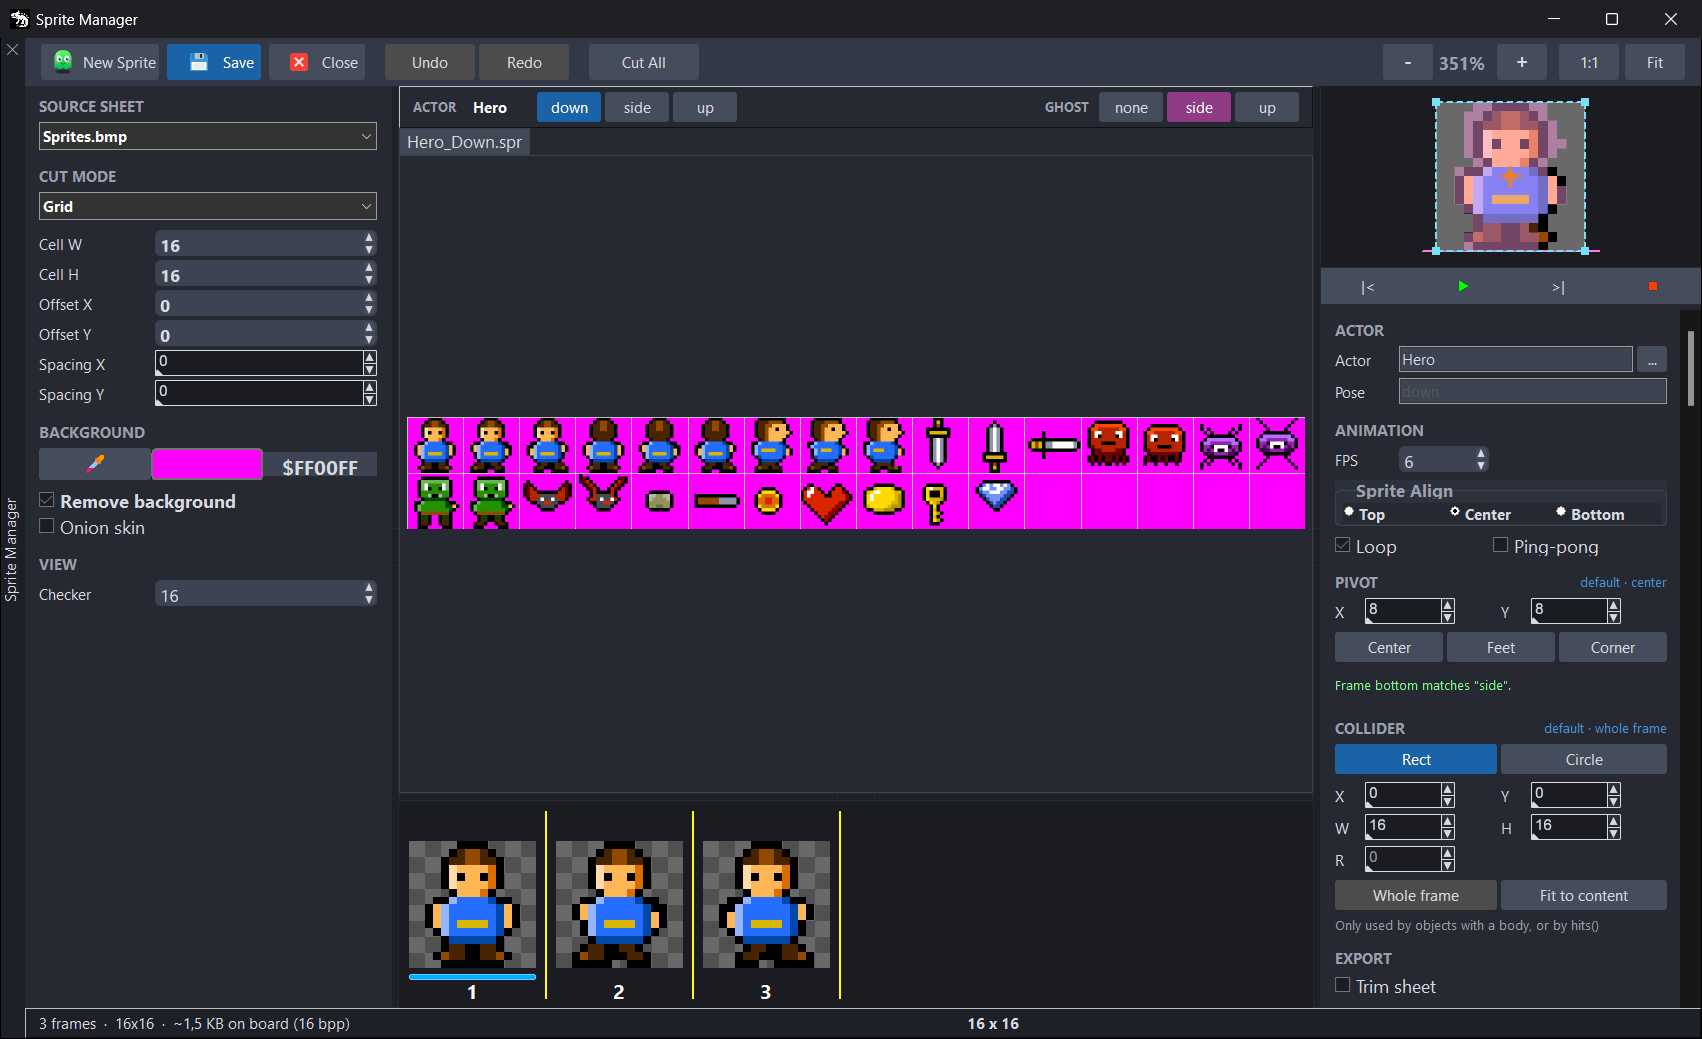
Creating an actor and its poses
In JaruQuest, the hero has three sprites: Hero_Down, Hero_Side and Hero_Up. To make them the actor Hero:
- Open
Hero_Downand typeHeroin Actor, in the ACTOR section on the right. Leave Pose empty: the pose it will get,down, shows in gray. - Do the same in
Hero_Sideand inHero_Up. The ... button next to it offers the actors the project already has. - Save all three.
As soon as you type the actor, the pose bar appears above the sheet.
To add a pose, open one of the actor's poses and choose New pose of Hero... in the ... menu. It asks for the name of the new sprite, creates it in Sprites and opens it with the same sheet, background, actor, pivot and collider. All that is left is to cut its frames.
The naming rules:
- With Pose empty, the pose is the file name without the actor in front, in lowercase:
Hero_Down.spr, in the actorHero, isdown. If nothing is left, because the file is named like the actor, it is the whole name:Hero.sprishero. Whatever is not valid in a name becomes_, and if it starts with a digit it gets apin front. - The actor and the pose end up as names in the generated code, so they must be JARU identifiers: unaccented letters, digits and
_, starting with a letter or_, and not reserved words. Heroandheroare the same actor, but the editor warns you to spell it the same everywhere.- An actor can't have two poses with the same name. The first sprite, in path order, keeps it.
What is not valid shows as a warning in the status bar, and that sprite, or the whole actor, is left out of the generated code.
The pose bar and the ghost
When the open sprite has an actor, a bar appears above the sheet with:
- ACTOR, the actor's name and one button per pose, in alphabetical order. The open one is blue. Press another to open it in its tab.
- With two poses or more, GHOST: none and the other poses.
The ghost is the first frame of another pose, in pink over the preview, with both pivots on the same point. A pink line marks the bottom edge of its slot. It shows whether the two poses stand on the same floor: if not, the character jumps when it switches from one to the other. The ghost you choose applies to all the poses of the actor while the editor is open, and it is not saved.
With a ghost, below the pivot buttons a row compares both slots: "Frame bottom matches "side"." if their bottom edges are at the same height, or "Frame bottom is 3 px below "side"." if not. Then the Set Y to N button moves the pivot so they match.
Fit to content, with an actor, fits the collider to the drawing of all the poses, laid over each other by their pivots. That way the collider doesn't change when the actor switches poses.
The code it generates
With actors in the project, the IDE writes Code/Actors.gen.aru. For each actor it has a struct with one field per pose, and two functions. For the JaruQuest hero:
use Sprite

// ---- Hero: down, side, up ----
struct ActorHero
    var down = nil
    var side = nil
    var up = nil
end

func ActorHeroLoad()
    return ActorHero(Sprite.load("Sprites/Hero_Down.spr"), Sprite.load("Sprites/Hero_Side.spr"), Sprite.load("Sprites/Hero_Up.spr"))
end

func ActorHeroCopy(src)
    return ActorHero(Sprite.new(src.down), Sprite.new(src.side), Sprite.new(src.up))
end
ActorHeroLoad()loads every pose withSprite.loadand returns anActorHerowith a sprite in each field.ActorHeroCopy(src)returns anotherActorHerowith a copy of each pose ofsrc, made withSprite.new: new sprites that share the frames and carry the same pivot, animation and collider.
To use it, import it. Call Load once, at the start, and make the other copies with Copy: each Load loads the frames again.
use Display, Sprite
import "Actors.gen.aru"

var draw = Display.draw
Display.open(320, 240)
Display.fps = 30

var hero = ActorHeroLoad()         // the three poses, loaded once
var twin = ActorHeroCopy(hero)     // another hero sharing the frames

hero.down.x = 120                  // each pose is a sprite
hero.down.y = 120
twin.side.x = 200
twin.side.y = 120

while (true)
    draw.cls()
    draw.sprite(hero.down)
    draw.sprite(twin.side)
    Display.update()
end
More about the file:
- The names start with
Actorso they don't clash with the functions the scene editor generates for each room. - The
Copyfunction is only written if the project's code names it: on the board, every function takes memory even if nobody calls it. Write the call, save the file and compile: the Build adds it. Until then, the file has a comment in its place. - It is rewritten when a sprite is saved and before every compile. Don't edit it by hand.
- It is added to the project's
Codefolder. A project that never had actors doesn't have it. If you remove the actor from every sprite, it is left with no code, and you can delete it. - If another code file of the project already defines one of its names, the Output warns about it when you compile.
What it saves and what it generates
Save saves the sprite to its .spr, a JSON file. Switching tabs, answering Yes when closing it with changes, and Home › Project › Save on the ribbon save it too.
.spr field | What it is |
|---|---|
imageNodeID, imageRelativePath | The sheet: the number of its image inside the project, and its path. |
sourceWidth, sourceHeight | The size of the sheet the last time the sprite was saved. If it changes, the editor warns. |
actor, pose | The actor and the pose, if it has them. |
animation | The rest: FPS, Sprite Align, the background color and Remove background, the grid (Cell W, Cell H, Spacing X and Spacing Y), Loop, Ping-pong, the pivot, the collider and Trim sheet. |
regions | The frames, in order: the x, y, width and height of each one inside the sheet. |
The sheet goes by the number of its image in the project: a .spr copied from another project points to an image that isn't its own. Choose it again in SOURCE SHEET.
When you compile (Build › Compile, and the scene editor's Play if some resource has changed), the IDE exports every sprite of the project to Build/flash, with the same path as its .spr:
| File | What it holds |
|---|---|
Build/flash/Sprites/<sprite>.bmp | The sprite sheet: all the frames, one below the other, each in a slot of the same size. |
Build/flash/Sprites/<sprite>.json | What Sprite.load reads: the slot size, how many frames there are and the FPS. And, only if they are not the defaults, the transparent color, Loop, Ping-pong, the pivot and the collider. |
- With more than 255 frames there is no sheet: each frame goes in its own
.bmp,<sprite>_000.bmp,<sprite>_001.bmp… - The
.jsonformat is described inSprite.load. - A sprite with no sheet or no frames is not exported, and the Output says so: "Sprite has no source image or regions defined. Skipping"
- If a sprite's sheet is no longer in the project, the Build stops: "Source image for sprite not found"
- With actors, the IDE also writes
Code/Actors.gen.aru(see "Actors and poses").
The Build reads the .spr from disk: compiling doesn't save the sprite editor. What you haven't saved doesn't reach the game.
Shortcuts
| Shortcut | What it does |
|---|---|
Ctrl+Z | Undo. |
Ctrl+Y | Redo. |
Ctrl+S | Saves the sprite. |
Ctrl+0 | Zoom to 100 % (1:1). |
Ctrl+9 | Fits the sheet in the view (Fit). |
+ and - | Zoom the sheet in and out. |
Ctrl + wheel, over the sheet | Zooms the sheet in or out. |
Space | Plays or stops the animation. |
← and → | Go to the previous or the next frame. |
Delete | Removes the marked frames. |
Keys without Ctrl don't work while you are typing in a box: then they go to the box.
From code
Sprite.load takes the path of the .spr inside the project and loads what the Build exported:
use Display, Sprite

var draw = Display.draw
Display.open(320, 240)
Display.fps = 30

var hero = Sprite.load("Sprites/Walk.spr")   // the sprite from the walkthrough
hero.x = 160        // x and y are the pivot
hero.y = 120

while (true)
    draw.cls()
    draw.sprite(hero)   // it animates by itself, at its FPS
    Display.update()
end
- What you set in the editor is how the sprite starts. Code can change it:
frameRate(in milliseconds per frame),loop,yoyo,pivotandcollider. - Load each sprite once. To have several identical ones, use
Sprite.new(sprite): they share the frames. - In a game with rooms you write none of this: the objects of the scene editor use the sprite as it is, with its pivot and its collider.
- Actors are loaded with
Code/Actors.gen.aru(see "Actors and poses").
Everything else is in Sprite.
Known issues
- The editor's New Sprite doesn't check the name. If there is already a sprite with that name in
Sprites, it doesn't warn: it opens that sprite in another tab, as if it were new, may change its sheet to the one of the sprite you had open, and the explorer lists it twice. If you save, you overwrite it. Create sprites with the explorer's New Sprite, which does warn. - With an Offset, clicks are off. If Offset X or Offset Y is not 0, a single click counts the offset twice. In Grid it may cut a different cell from the one with the red frame. In Auto and with the eyedropper, it takes the pixel that many pixels further left and further up. The marquee and Cut All cut correctly: with an Offset, cut with them, and use Auto and the eyedropper with the Offset at 0.
- Typing in Offset X or Offset Y doesn't move the grid. If you change the number with the keyboard or the mouse wheel, the grid doesn't move until you click the box. Use its arrows, or click it after typing.
- Auto and Cut All don't see the swatch color. They look for the background with the color the eyedropper took or, if you haven't used it, with the one the editor detects along the edge of the sheet when it opens. The one you choose by clicking the swatch doesn't count for them. If they find nothing or cut too much, take the background with the eyedropper right before.
- Without Remove background, black is transparent in the game. Without the checkbox, the
.jsoncarries no transparent color, and the VM takes black (#000000) as such, just likeBitmap.load. The preview shows that black, but in the game it isn't drawn. If the sprite has pure black that must show, tick Remove background with a background of another color.
All the known issues of JARU, together, are in Known issues.