Git
The Version Control panel keeps your project under Git without leaving the IDE: you see which files have changed, make commits, create branches and switch between them, look at the history, and push and pull your changes to and from a server (GitHub, GitLab or your own).
You open it with Home › View › Git. It's a panel like the others (The interface).
- It works on the folder of the open project. With no project, the panel is empty.
- You need Git installed: the panel runs the
gitcommand for everything, so it has to work from a console. Git also has to know your name and your email (see "Creating the repository"). - It doesn't show which lines have changed, and it doesn't let you discard changes. For that, use another Git tool on the same folder.

A walkthrough
A project under Git, from the first commit to the server.
- Create the repository. Open the panel. If the project has no repository, it says "This project is not under version control yet.": press Initialize Repository. The IDE creates the repository and makes a first commit with all the files.
- Change something. Edit a file and save it. In the panel, press the refresh button, the round arrow to the right of History: the file shows up in Unstaged as
Modified. - Stage it. Select it and press Stage, or press Stage All to move them all: it shows up in Staged.
- Commit. Delete the text in the box at the bottom, write what you changed and press Commit.
- Push it. Create an empty repository on your server and copy its address. Press Remote Config, paste it in Remote Repository URL and press Connect and Push. The Output tells you how it goes.
Creating the repository
If the project folder has no repository (there is no .git), the panel only shows Initialize Repository. When you press it, the IDE:
- creates the repository (
git init); - stages every file in the folder, except the ones a
.gitignoreleaves out; - makes the first commit, with the message
First commit.
You can also create it when you make the project, with the Initialize Git repository checkbox of the wizard (Projects). That checkbox also writes a .gitignore, which leaves out the Build folder and other files you don't need. The panel's button doesn't write it: its first commit takes everything in the folder, Build included. If you don't want it in the repository, first create a .gitignore in the project folder with the line Build/.
Every commit carries your name and your email, and the IDE doesn't ask you for them. If Git doesn't have them, the commit fails and the Output says why. Set them once, from a console:
git config --global user.name "Your Name"
git config --global user.email "you@example.com"
File status
The main view has, from top to bottom:
- the current branch, in a drop-down list, and New Branch;
- Fetch, Pull, Push, History and the refresh button;
- Staged: what goes into the next commit;
- Unstaged: the rest of the project's files;
- the message box and Commit;
- the branch list.
The panel doesn't watch the disk: whatever you save doesn't show until you press the refresh button. It updates by itself when you open it, when you change projects and after each operation.
Unstaged shows the rest: the files that have changed, the new ones and also the ones that haven't changed. Each file carries its status, with its colour:
| Status | What it means |
|---|---|
Modified | It has changed since the last commit. |
Untracked | It's new: Git doesn't track it yet. |
Deleted | You have deleted it. |
Staged | It's new and already in Staged. |
Renamed | You have renamed it. |
Conflict | It clashed in a merge or a pull (see "Branches"). |
Unmodified | It hasn't changed. |
To move files from one list to the other:
- Stage moves the file selected in Unstaged to Staged. You select one at a time.
- Stage All moves everything that has changed to Staged, new and deleted files included.
- Unstage takes the selected file out of Staged.
- The right-click menu, on both lists, also has Stage and Unstage.
Commit
Write the message in the box at the bottom and press Commit. The commit takes what is in Staged; whatever is still in Unstaged stays out. When it's done, the box is emptied and the lists are updated.
- With no message, it does nothing and tells you: "Please enter a commit message.".
- With nothing in Staged, Git doesn't make the commit: you get "Error committing changes.", and the reason, in the Output.
When you open the panel, the box already holds "Briefly describe the changes made.". It isn't a hint, it's text: delete it before you type, or it goes into the commit message.
Branches
The current branch shows at the top, in the drop-down list, and at the bottom, in the branch list, with a * in front. The list at the bottom has them all: yours (Local) and the server's (Remote, like origin/main), which show up after a Fetch, a Pull or a Push.
- New Branch asks for the branch name. It creates the branch at the current commit and switches to it. Whatever has no commit comes with you to the new branch. The name can't have spaces.
- To switch branches, pick the branch in the list at the top, or double-click it in the one at the bottom. You can only switch to a local branch: to work on one from the server, first create, from a console, a local branch that tracks it.
The right-click menu, on the list at the bottom:
- Switch to this branch (checkout): switches to that branch.
- Merge into current branch...: after asking, merges that branch into the current one (
git merge). Local branches only. - Delete local branch...: after asking, deletes the branch. It doesn't delete the current one. If the branch has commits that haven't been merged into the current one, Git refuses and says so in the Output.
- Delete remote branch...: after a warning, deletes the branch from the server (
origin).
When you switch branches, the IDE first saves everything you have unsaved in the editors, like Home › Project › Save, and switches without forcing: uncommitted changes to the files the other branch doesn't touch come with you. If the other branch changes a file in which you have uncommitted changes, Git doesn't switch: the IDE warns you and the Output says which file it is. Commit that change, or undo it, and try again.
Then the IDE checks which files are different. If the project's .jpr changes, it asks whether to reload the whole project. If a file changes that you have open in an editor (the code editor, the image editor, the sprite editor, the Music Tracker, the tilemap editor or the scene editor), it asks whether to reload it.
If a merge (or a pull) clashes, the files in conflict show up in Unstaged as Conflict. Fix them in the editor, stage them and commit.
History
History switches the panel to the history view, and Back goes back. At the top it gives the current branch (Branch:) and how many commits there are across all branches (Total Commits:).
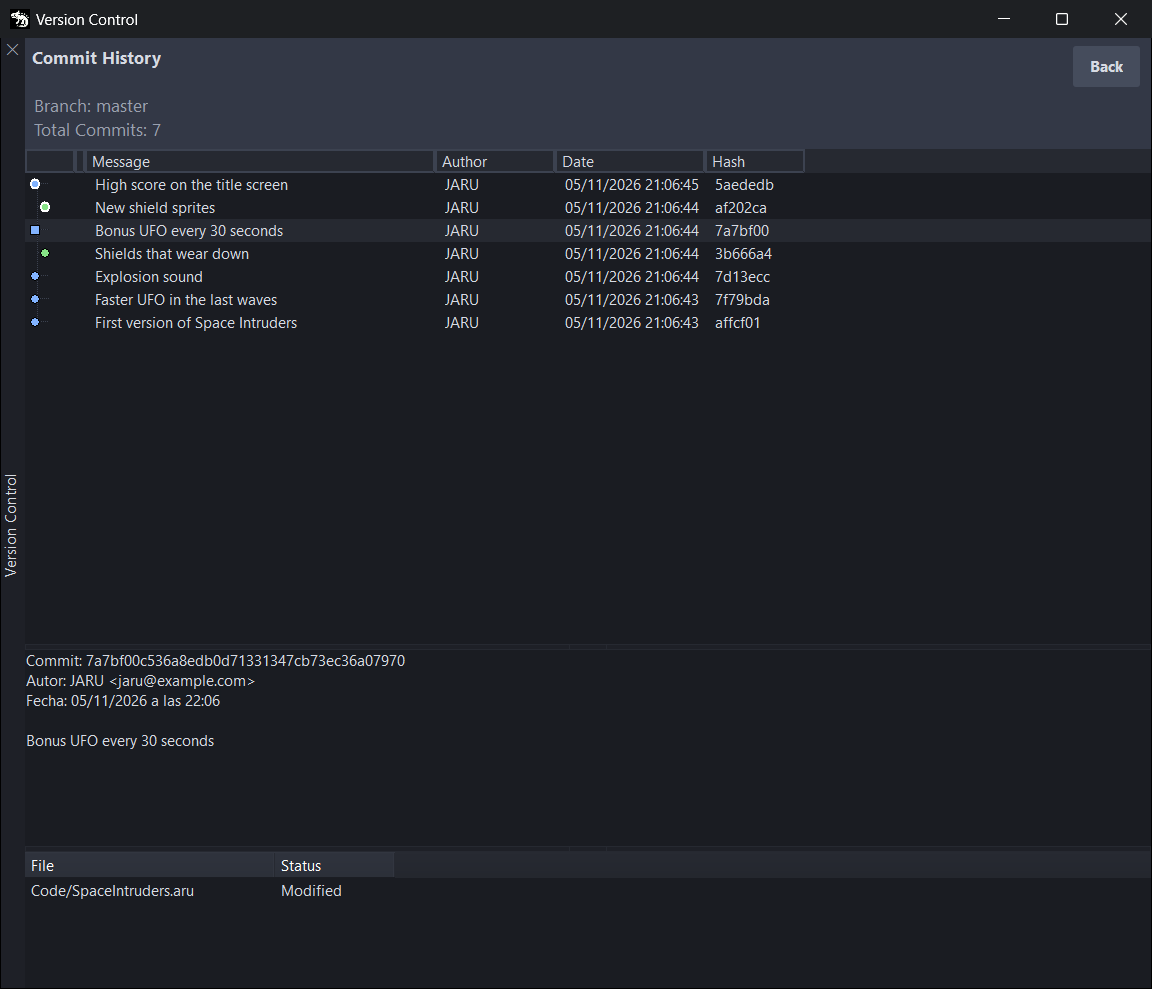
The list holds the commits of every branch, newest first, with their message (Message), their author (Author), their date (Date) and their short hash (Hash). The first column puts a colour mark on each commit, further to the right if it belongs to another branch:
- a circle is a normal commit, and a square, a merge;
- a white border means that a branch or a tag points to that commit.
It doesn't draw the lines that join the commits.
Click a commit, or move through the list with the arrow keys: below it you get its hash, its author, its date and its whole message, and under that, the files it changed, with their status (File and Status). To see which lines changed, use another Git tool.
Remotes
A remote is a repository on a server that you push your commits to. The panel works with one, origin.
While the project has no remote, Fetch, Pull and Push are disabled, and Remote Config shows up next to Unstage. To connect it:
- Create an empty repository on the server and copy its address.
- Press Remote Config and paste the address in Remote Repository URL. It has to start with
http(https://…) or withgit@. - Press Connect and Push: the IDE adds the remote as
originand pushes the current branch. Cancel goes back without doing anything.
From then on, Remote Config no longer shows, and the other three are enabled:
- Fetch brings the server's news without touching your files: the server's branches are updated, and the ones deleted there disappear from the list.
- Pull brings the commits of the server's branch and merges them into yours (
git pull). A branch you have never pushed has nowhere to bring them from: push it first with Push. - Push uploads your commits. The first time you push a branch, it creates it on the server and links it to yours; from then on, Push and Pull go to that one.
All three run in the background: the Output says what Git is doing and how it ends, and when it's done, the panel updates. The panel has nowhere to type a user name or a password: if the server asks for them, Git uses whatever it has configured.
Known issues
- The message box isn't empty: it holds the text "Briefly describe the changes made." (see "Commit").
- A file changed after Stage shows only in Staged. If you change a file that is already in Staged, it doesn't show up again in Unstaged, and the commit takes the version you staged, not the latest one. Press Stage All before Commit.
- The panel doesn't update after a merge or after deleting a server branch. After Merge into current branch... and Delete remote branch..., the lists stay as they were: press the refresh button.
- A mistyped remote address stays. Connect and Push adds the remote even if the push fails, and from then on Remote Config no longer shows. Change it from a console with
git remote set-url origin <address>.
All the known issues of JARU, together, are in Known issues.