Image editor
The image editor draws and touches up the images of the project: backgrounds, title screens, tilesets and sprite sheets. It has the tools of a simple pixel art program: pencil, eraser, lines, rectangles, ellipses, fill, eyedropper and a selection to move, copy and paste. Its window is called Image Editor.
It edits the image files of the project, which usually live in the Images folder and are BMP. When you compile, the IDE exports the ones that have Include in Build on into Build/flash, and your game loads them with Bitmap.load. Tilemaps and rooms use them as tilesets or backgrounds, and sprites cut their frames from them.
There are five ways to open it:
- Double-click an image in the explorer. If it is already open, it switches to its tab.
- New Image, in the explorer menu (right-click): it opens the editor with the new image box, like its New button.
- Import Image, in the explorer menu or on its button bar: it asks for an image on your computer (PNG, BMP, JPG or GIF), converts it to BMP, puts it in the folder you have selected in the explorer, or in Images, and opens it.
- Double-click the frame strip of the sprite editor: it opens the sprite's sheet.
- Home › View › Images, on the ribbon: it shows the editor with the images it already has open.
Each image opens in its own tab. If it has unsaved changes, its name has a * in front. You reorder the tabs by dragging them.

The window has four areas:
- At the top, the button bar: files, undo, transformations and zoom.
- On the left, the panel: the file, the crop, the tools, the colors and what gets exported.
- In the middle, the tabs with the images.
- At the bottom, the status bar.
A walkthrough
A background image for your game, from start to finish.
- Create the image. In the explorer, right-click › New Image. In the New Image box, type a name, for example
Background, set Width to 320 and Height to 240, and press Create. The editor opens the image in a tab, filled with the Background color. It has no file yet: the status bar says "Not saved yet". - Draw. Pick a color in Foreground Color, choose the Fill tool and click the image: it fills it with that color. Then draw with Pencil, Line, Rectangle or Ellipse. The left button paints with the foreground color and the right one with the background color. If you make a mistake, Undo.
- Save. Press Save. Since the image is new, it asks for its name in Images. Accept: the IDE saves it as
Images/Background.bmp, adds it to the project and tells you so: "Background.bmp added to Images". The status bar now says "Project". - Check Include in Build. It is on: when you compile, the image will reach the game. That box doesn't go in the image but in the project, and the IDE saves it as soon as you change it.
- Use it. Compile with Build › Compile: the IDE exports
Build/flash/Images/Background.bmp. In your code, load it withBitmap.load("Images/Background.bmp"): see "From code" below. In a game with rooms, put it on an image layer.
Tools
The tools are in the Tools section of the panel. They paint with the mouse on the image: the left button with the foreground color (Foreground Color), and the right one with the background color (Background Color). They have no keys.
| Button | What it does |
|---|---|
| Pencil | Paints wherever you go, one click at a time or dragging. |
| Eraser | Paints with the background color, with either button. It doesn't leave transparency. |
| Line | Drag from one end to the other and let go: it paints the line. |
| Rectangle | Drag from one corner to the other and let go: it paints the outline of the rectangle. |
| Ellipse | Drag from one corner to the other and let go: it paints the ellipse that fits in that rectangle. |
| Fill | Fills the area of the clicked pixel: the pixels joined to it by a side, not diagonally, that have exactly its same color. |
| Eyedropper | Takes the color of the clicked pixel: with the left button as the foreground color, with the right one as the background color. |
| Select | Picks a rectangle to move, copy or delete it (see "The selection"). Left button only. |
While you drag Line, Rectangle or Ellipse, the shape shows over the image, and it is painted when you let go. Each stroke, from press to release, is one undo step.
The chosen tool applies to every tab. The colors, the brush and the grids belong to each tab.
Brush Size and Fill with background
- Brush Size: the thickness of Pencil, Eraser, Line and the outline of Ellipse, from 1 to 64. With 1 it paints one pixel; with more, a circle 2 × Brush Size − 1 pixels wide: with 3, 5 wide. Rectangle doesn't use it: its outline is always 1 pixel.
- Fill with background: rectangles and ellipses come out filled with the background color, outlined with the foreground color. With the right button, the other way round. Off by default.
Colors
The two color boxes of the panel are the foreground color (Foreground Color) and the background color (Background Color). There are three ways to change them:
- Clicking the box opens the Windows color picker.
- Below, a row of swatches holds the colors of the image, from most to least used, up to 15. Clicking one makes it the foreground color; with the right button, the background color. Transparent pixels don't count.
- Eyedropper takes the color of a pixel of the image.
A new image starts with the colors of the New Image box; one you open, with black as the foreground and white as the background.
The selection
With Select, drag over the image: the rectangle you mark gets a dotted outline.
- To move it, drag it from inside. It lifts and leaves its hole in the background color, like the eraser. While you move it, it floats over the image and can go partly outside it. The arrow keys move it one pixel at a time.
Ctrl+Ccopies it.Ctrl+Xcopies it and leaves its place in the background color.Ctrl+Vpastes and switches to Select. The pasted part floats over the selection or, if nothing is selected, where the copied part was. Drag it into place. You can paste into another tab: that is how you take a drawing from one image to another.Ctrl+Aselects the whole image.Deleteerases the selection and leaves its place in the background color. Something just pasted is simply removed.EscorEnterdrop it: what floats stays painted where it is, and nothing is selected any more. A click outside the rectangle, or changing tools, does the same.
What floats is painted with its transparency: the transparent parts of what you paste don't cover what is below.
What you copy also goes to the Windows clipboard, so you can paste it into another program, but without transparency: transparent parts come out in the background color. And the other way round: Ctrl+V pastes what you copied in another program, at the top left.
Moving and pasting are one undo step each. If you undo while something floats, the floating part goes away and the image goes back to how it was.
The button bar
From left to right. The buttons with no text tell you their name when you hover over them.
Files: New, Open, Save, Save As and Close
-
New opens the New Image box: Name, Width and Height (from 1 to 4096 pixels), and the foreground and background colors (Foreground and Background: click each box to change it). It suggests the size of the last new image; the first time, 32 × 32. Create opens it in a tab, filled with the background color. The name is the tab's name and the one it suggests when you save it.
-
Open opens an image from your computer (PNG, BMP, JPG or GIF) as it is: it doesn't add it to the project, and the status bar says "Not in the project". To edit an image of the project, open it from the explorer.
-
Save saves the image of the tab:
- if it belongs to the project, or you opened it with Open, into its file;
- if it is new, it adds it to the project: it asks for the name and saves it in Images, as BMP, like Import to Project (see "File / Status").
When saving it applies Output and Crop, which can change the size of the image (see "Panels and options").
-
Save As saves the image to another file, in the format of its extension: PNG (the default), BMP, JPEG or GIF. If it belongs to the project, it asks first:
- Yes: it saves a copy, and the tab stays on the project image.
- No: the tab switches to editing the copy, outside the project. The project image stays as it was.
- Cancel: it doesn't save.
-
Close closes the tab. If there are unsaved changes, it asks whether to save them.
Undo and redo
Undo and Redo (the two arrows) undo and redo. Each stroke, fill, shape or transformation is one step, and moving, pasting or deleting the selection is another. Each tab has its own history, with no limit on steps, which starts over when you open or create the image.
Moving the Crop cut is not a step, and neither are the panel settings: Output, Include in Build and Palette. Saving with Crop, or with an Output different from the size of the image, is: undoing it brings back the image as it was before saving. When you undo a step that changed the size of the image, Output goes back with it.
Transformations
They change the whole image, not the selection. Each one is an undo step.
| Button | What it does |
|---|---|
| Resize | Changes the size of the canvas, without stretching the drawing. It asks for the width and height in pixels, and then for the color of the new part: if you close the picker without choosing, the background color. The drawing stays at the top left. If the canvas grows, the new part appears on the right and at the bottom; if it shrinks, whatever is left over on the right and at the bottom is lost. |
| Rotate - and Rotate + | Turn the image 90°, to the left and to the right. |
| Flip H and Flip V | Flip it horizontally (like a mirror) and vertically. |
| Gray Scale | Turns it into grays. |
| Invert Colors | Inverts the colors: black becomes white, red becomes cyan… Transparent parts stay transparent. |
To stretch or shrink the drawing, use Output (see "Panels and options").
Zoom
- - and + zoom the image out and in, from 25 % to 3200 %.
Ctrl+ mouse wheel does the same, towards the point under the pointer. - 1:1 sets the zoom to 100 %: one image pixel per screen pixel.
- When you open an image, or switch tabs, the zoom adjusts so that you see it whole.
The current zoom shows in the status bar.
Panels and options
File / Status
- File: the file name of the image, or the tab's name if it has no file yet. Read-only.
- Import, with a project image or with none: does the same as Import Image in the explorer, but always puts the image in Images.
- Import to Project is the same button with an image that doesn't belong to the project (new, or opened with Open): it adds it to the project. It asks for its name and saves it in Images as
<name>.bmp. If there is already one with that name, it doesn't overwrite it: it tells you. - Crop: see below.
The Import button can only be pressed if the project has the Images folder.
Crop
Crop crops the image. When you press it, a rectangle covering the whole image appears over it. Drag it, or drag its edges and corners, or type Left, Top, Width and Height, in pixels.
The crop happens when you save: with Crop pressed, Save keeps only what is inside the rectangle. While it is pressed, you can't draw or select. Press it again to go back to drawing: if you haven't saved, nothing is cropped.
The grids
- Show Grid: the pixel grid. On by default, but it only shows with the zoom at 800 % or more.
- Tiles: another, brighter grid, spaced by the number of pixels in the box next to it, from 2 to 256 (16 by default). It helps you draw a tileset without going outside each tile. It shows even with Show Grid off, as soon as each tile is 4 pixels or more on screen.
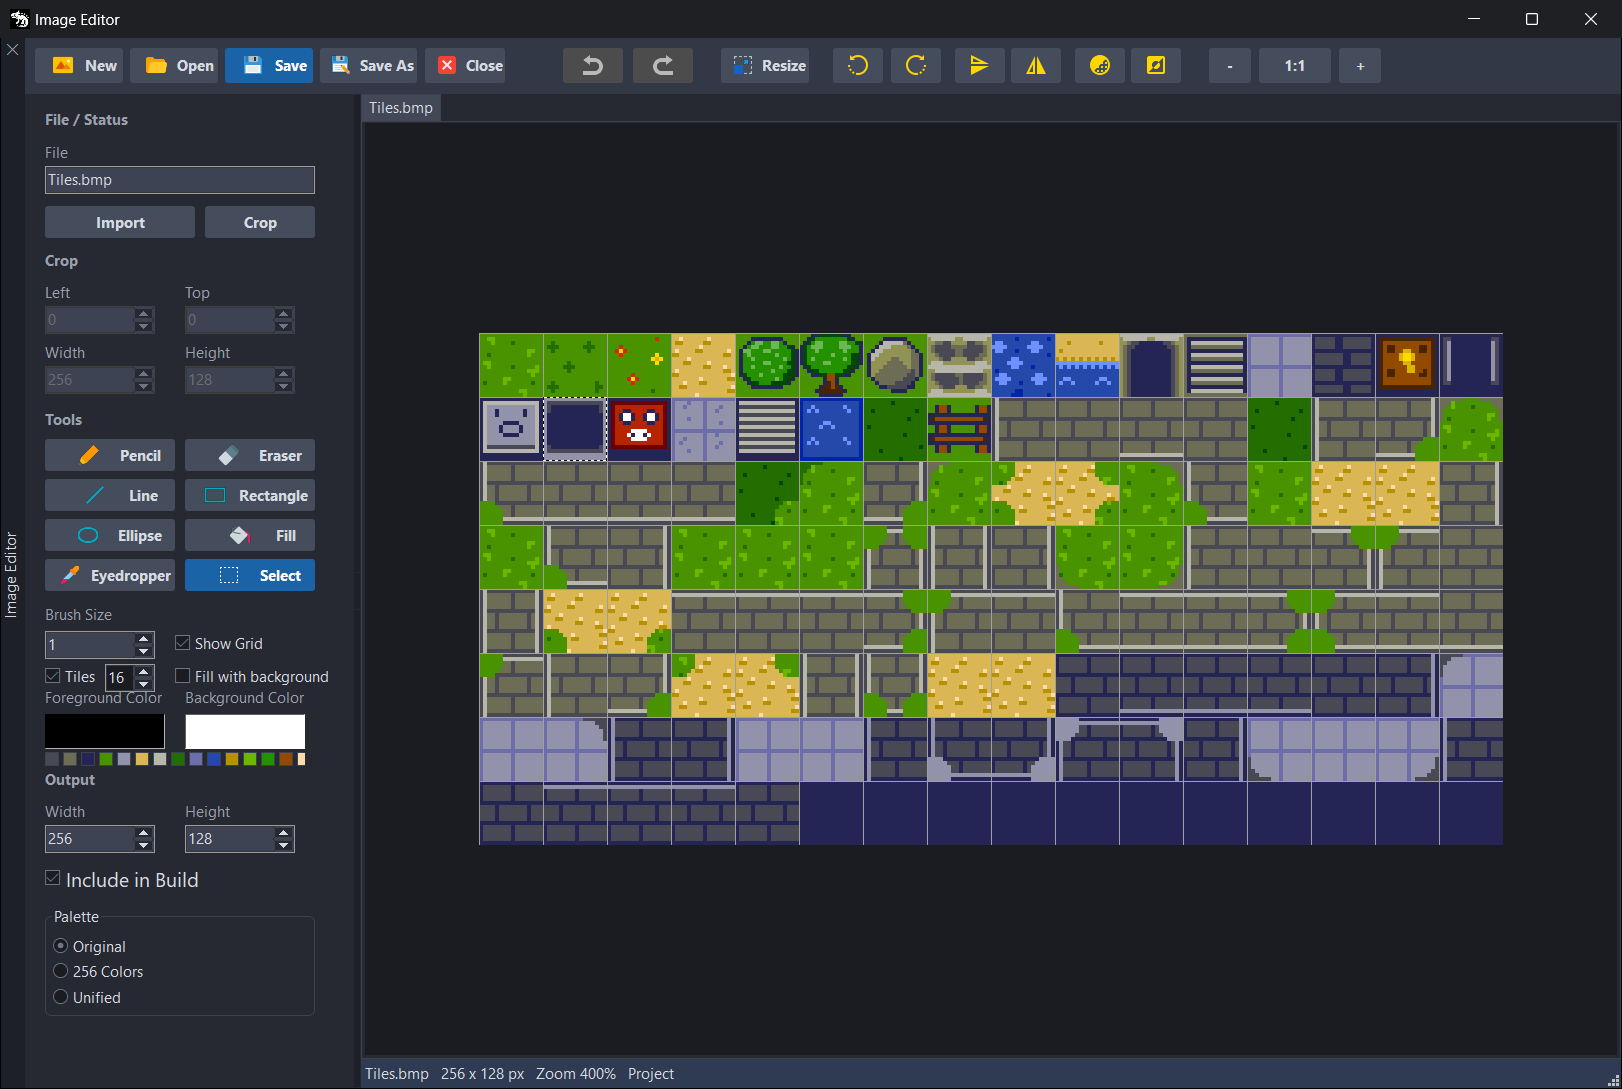
Output
The Width and Height of Output are the size the image is saved with. When you open or create it, they are its own. If you change them, Save scales it to that size, smoothing: it lets you make it bigger or smaller in one go, but in pixel art the edges come out blurry.
- With Crop pressed, Output doesn't count: the crop wins.
- Changing Output counts as an unsaved change.
- Resize, Rotate - and Rotate + set it to the new size of the image, and undoing them, to the previous one.
Include in Build
With Include in Build on, when you compile the IDE exports the image into Build/flash, which is where the game loads it from. Off, it doesn't export it.
- Turn it on for the images your code loads with
Bitmap.loadand for the ones tilemaps and rooms use: tilesets and the images of image layers. - Turn it off for the ones that are only a sprite's sheet: the sprite exports its own sheet, and the image would only take up space on the board. JaruQuest does it this way:
Images/Tiles.bmpandImages/Cover.bmphave it on, andImages/Sprites.bmpandImages/Boss.bmp, which are its sprites' sheets, off. - The images the IDE adds to the project get it on: a new one you save, one you import and the Extract Tiles tileset.
Palette
When compiling, the IDE can change the colors of the image before exporting it:
- Original: as it is, with all its colors. The default.
- 256 Colors: it brings it down to 256 colors at most, the ones that represent it best. Each pixel turns into the closest one, without dithering.
- Unified: all the images with Unified share the same 256 colors, which the IDE takes from all of them together, including those with Include in Build off. Each pixel turns into the closest one.
It only changes what gets exported: the image file isn't touched, and the editor keeps showing it with its colors. It doesn't save memory or space either: the exported BMP takes up the same, and the VM stores each pixel in 16 bits with any palette. Use it only if you want an image, or several, to have fewer colors.
The status bar
It shows the name of the image, its size in pixels, the zoom and where it comes from, for example "Cover.bmp 320 x 240 px Zoom 319% Project". The last part can be:
- "Project": it is an image of the project.
- "Not saved yet": it is new and has no file yet.
- "Not in the project": it is a file from outside the project, opened with Open or saved with Save As.
What it saves and what it generates
Save saves the image to its file, in the format of its extension. Project images are usually BMP, because Import Image, Import and Import to Project convert them. A BMP is saved with 24 bits per pixel, or 32 if the image has anything transparent.
Home › Project › Save, on the ribbon, saves every image with changes and, on top of that, the project.
Include in Build and Palette don't go in the image but in the project file, the .jpr, in each image's data, and the IDE saves it as soon as you change them:
.jpr field | What it is |
|---|---|
SaveToData | Include in Build. |
PaletteOption | Palette: 1 is Original; 2, 256 Colors; and 3, Unified. |
Width, Height | Output the last time the .jpr was saved. The editor doesn't read it: when you open an image, Output is its size. |
The .jpr is also saved with Home › Project › Save and when you create, rename, move or delete something in the explorer.
When you compile (Build › Compile, and the scene editor's Play if some image, sprite, map or music file has changed), the IDE:
- Empties
Build/flash/Images. - Works out the shared palette of the images with Unified.
- Exports each image with Include in Build into
Build/flash, with its palette, with the same path as in the project and as BMP:Images/Title.pngends up asBuild/flash/Images/Title.bmp.
The Output reports it image by image: Exported image to \flash\Images\Background.bmp, or Skipping image (SaveToData is false) if it has Include in Build off.
Only Build/flash/Images is emptied. If you stop exporting an image from another folder, its BMP from the previous compilation stays in Build/flash: delete it by hand if you don't want it.
When you compile, the IDE reads the images from disk: neither Compile nor Play saves the image editor. What you haven't saved doesn't reach the game.
The BMP files the VM loads
It is the same on Windows and on the boards:
- The VM only loads BMP, uncompressed and with 16, 24 or 32 bits per pixel. The 1, 4 and 8-bit ones (palette-based) and the compressed ones don't load:
Bitmap.loadgives the error "Cannot load bitmap file". - When loading them, it turns each pixel into 16 bits (RGB565): 5 bits of red, 6 of green and 5 of blue. That is why two very similar colors can end up the same, and why
bpp()always returns 16. - It doesn't read the transparency of the file (the alpha channel). The transparent color is the one you pass to
Bitmap.load, black by default, and the VM compares it already in 16 bits: with black, an almost-black like#050305is transparent too.
What the IDE exports always works: a 24-bit BMP, or a 32-bit one if the image has anything transparent. Fully transparent parts of a PNG arrive as black, so with the default transparent color they are transparent in the game too. Semi-transparent parts are drawn opaque.
In the editor, transparent parts show as a gray checkerboard. The editor doesn't paint transparency: Eraser, Delete and the hole of what you move leave the background color.
Shortcuts
| Shortcut | What it does |
|---|---|
Ctrl+C | Copies the selection. |
Ctrl+X | Cuts the selection: copies it and leaves its place in the background color. |
Ctrl+V | Pastes, floating, and switches to Select. |
Ctrl+A | Selects the whole image and switches to Select. |
← → ↑ ↓ | With Select, move the selection one pixel. |
Delete | With Select, erases the selection: leaves its place in the background color. |
Esc or Enter | With Select, drop the selection. |
Ctrl + wheel | Zooms the image in or out, towards the pointer. |
| Right button | Paints with the background color. With Eyedropper and in the color row, picks the background color. |
The keys don't work while you type in a box, or with Crop pressed. There are no keys to undo, redo or save: use the buttons.
From code
Your game loads what the IDE exports, with the image's path in the project and the .bmp extension: Images/Background.bmp. If you drag the image from the explorer onto the code editor, a menu lets you pick Insert as Bitmap.load or Insert as Path, and writes the call or the path for you.
use Display, Bitmap

var draw = Display.draw
Display.open(320, 240)
Display.fps = 30

var background = Bitmap.load("Images/Background.bmp")   // the walkthrough image
var ship = Bitmap.load("Images/Ship.bmp", 0xFF00FF)       // with magenta transparent

while (true)
    draw.cls()
    draw.bitmap(0, 0, background)
    draw.bitmap(150, 200, ship)
    Display.update()
end
- The second argument of
Bitmap.loadis the transparent color. Without it, it is black. draw.bitmapdraws the image.- Sprites aren't loaded this way:
Sprite.loadloads them from their.spr(see the sprite editor). - In a game with rooms you don't write anything: the code the scene editor generates loads the tilesets and the image layers (The code it generates).
Everything else is in Bitmap.
Known issues
- The editor doesn't see changes from another program. If you change an image you have open with another program, the editor keeps the old one, and Save overwrites what the other program did. Close it in the editor before changing it elsewhere, and open it again afterwards.
- Rectangle doesn't use Brush Size. Its outline is always 1 pixel, even though the shape looks thicker while you drag it. For a thicker outline, draw its sides with Line.
- The scene editor's Play doesn't see Include in Build or Palette. It only exports the images again if some image, sprite, map or music file has changed, and these options don't change any. After changing them, compile with Build › Compile, which always exports.
- Deleting an open image with changes deletes it even if you answer Cancel. When you delete it in the explorer, the editor asks whether to save its changes; if you answer Cancel, the tab stays open, but the file is deleted anyway. Close it before deleting it.
All the known issues of JARU, together, are in Known issues.