Your first game with rooms
A game with rooms has several screens or levels, and a loop that decides which one is played. In JARU IDE each room is drawn in the scene editor and the IDE writes its code. You only write the game loop: the title screen, going from one room to the next, and the end.
This guide uses the StarterPlatformer template: a platformer with a title screen, two rooms (Level1 and Level2) and an end screen. Each piece links to the page of the manual that tells all about it.
Create the project from the template
- Open the project wizard, Project Wizard. It shows up by itself when the IDE starts. If you already have a project open, Home › Project › New closes it, after asking you about anything unsaved, and opens the wizard.
- In the Example Projects list, double-click StarterPlatformer.
- Create Project from Example opens and asks for the name of the new project, with
StarterPlatformerfilled in. Change it if you like, with no spaces, and accept. - The IDE copies the template to
Documents\JARUProjects\<name>and opens it. If there is already a folder with that name, it tells you: pick another one. - Press Build › Run. The IDE builds the game and opens it in the Windows VM.
On the title screen, Enter starts the game. The left and right arrows move the player, Space jumps and Esc closes the game.
The other template, StarterTopDown, is a game seen from above, with a title screen, one room and an end screen. It is created the same way. The whole wizard is in Projects.
The pieces
A game with rooms has four pieces. The first two are made in the scene editor; the IDE writes the third, and the fourth is your code.
1. The rooms
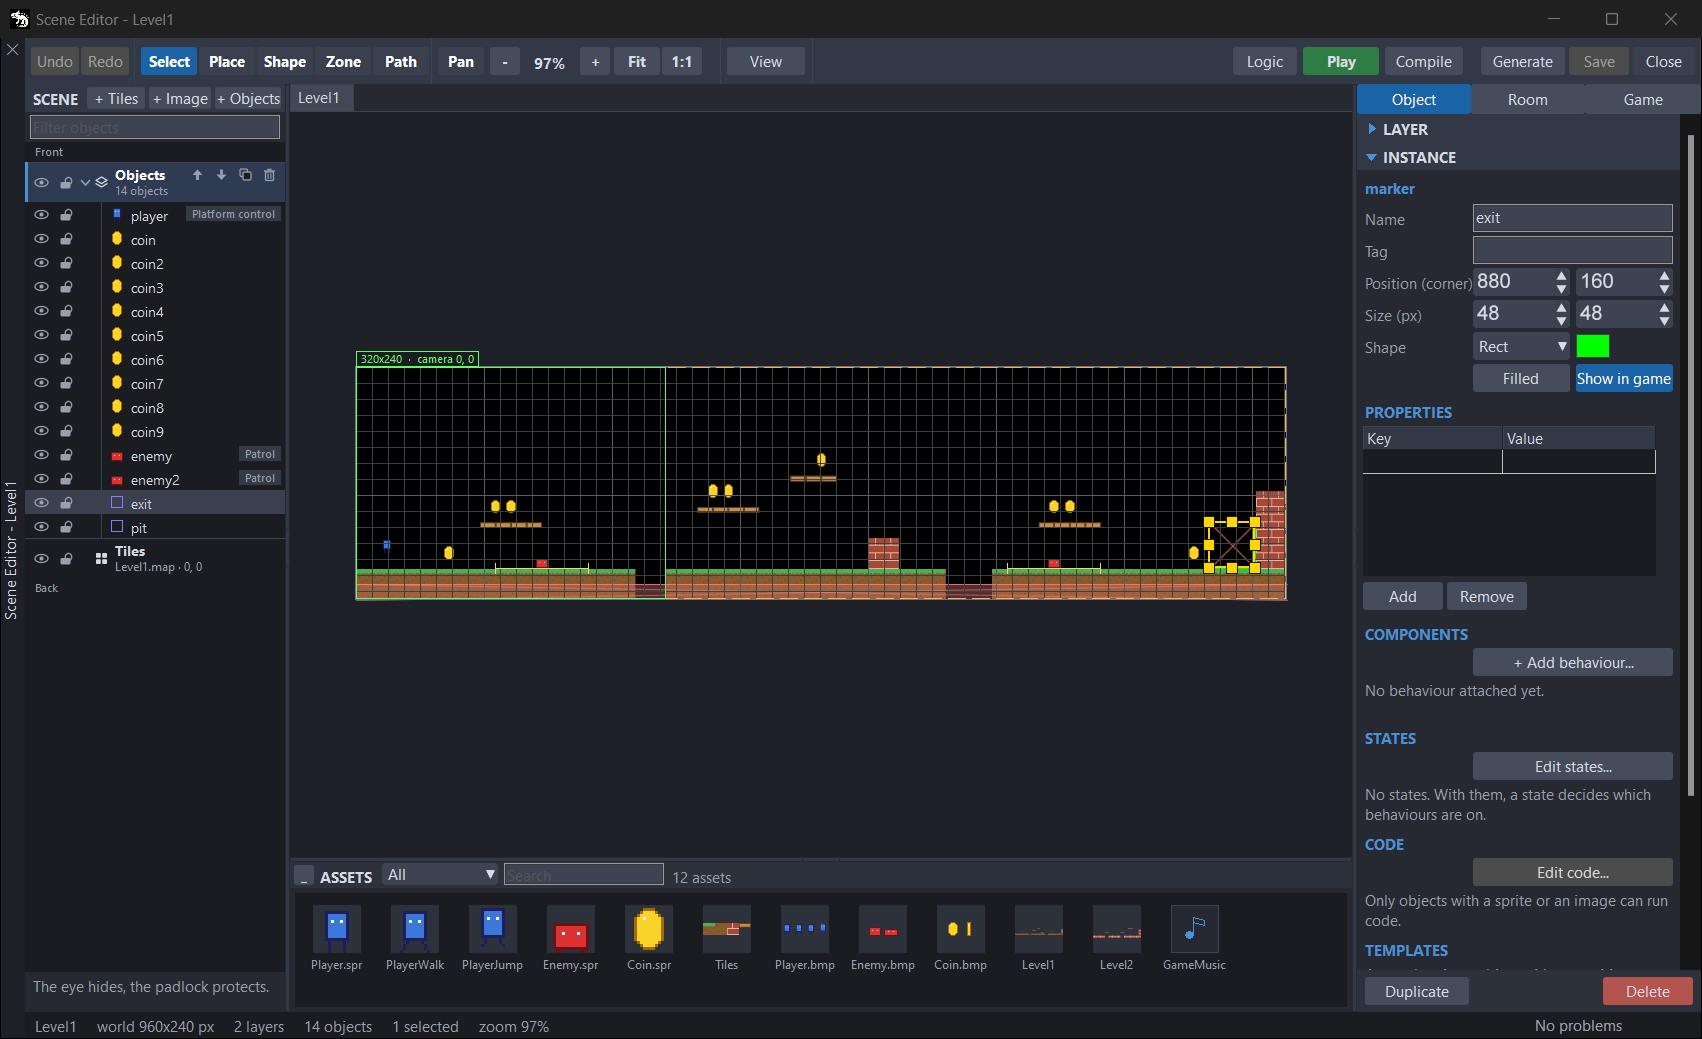
Each room is a .scn file in the Scenes folder: in StarterPlatformer, Level1.scn and Level2.scn. Double-click it in the explorer to open it. A room has:
- A tile layer,
Tiles, that draws the room's tilemap (Maps/Level1.map). Tilemaps are made in the tilemap editor, and Layers tells all about layers. - An object layer,
Objects: the player (player), the coins and the enemies. Each object can carry behaviours:playercarries Platform control (walk and jump with the controls), and the enemies, Patrol (go back and forth). See Objects and Behaviours. - Zones: invisible rectangles that the rules watch, such as
pit(falling into the pit) andexit(the way out). The exit has Show in game on: the game draws it as a green frame, so that the player can see where it is. See Zones. - The collision map, which tells what is floor and what is wall. It is not the tile layer: you choose it in Room › Collision map. In StarterPlatformer it is the same
Level1.mapthe layer draws, read by tile number (Tile numbers): tiles 0, 1 and 2 are solid, and 3 is a platform you can jump up through. See Collision map. - Rules (Logic button): when something happens, do something. See Rules and states.
These are the rules of Level1:
| Rule (WHEN) | Actions (DO) |
|---|---|
| When the room starts | Play or stop music: GameMusic. |
When two things touch: player and coin | Destroy (other, the coin), Play a sound effect (coin) and Change a variable: game.score, add, 10. |
When two things touch: player and enemy, with Not again for (s) at 1 | Play a sound effect (hit), Lose a life and Ask for another room: (this room). |
When it enters a zone: player in pit | Lose a life and Ask for another room: (this room). |
When it enters a zone: player in exit | Ask for another room: Level2. |
Level2 has the same ones, except the exit one: there the exit adds 1 to the game variable won (see Title and end).
Play, in the bar of the scene editor, tries the room alone, without your loop: no title screen and no end. Use it to try the room while you draw it. Esc closes the preview. Save, generate, play and compile tells all about it.
Play only rebuilds the assets (images, sprites, tilemaps and music) when one of them has changed. If you rename, move or delete one, it does not notice: it does not rebuild them, and the preview keeps what was in Build. To avoid it, delete Build/assets.stamp before pressing Play, or build with Build › Compile, which always rebuilds them.
2. The game
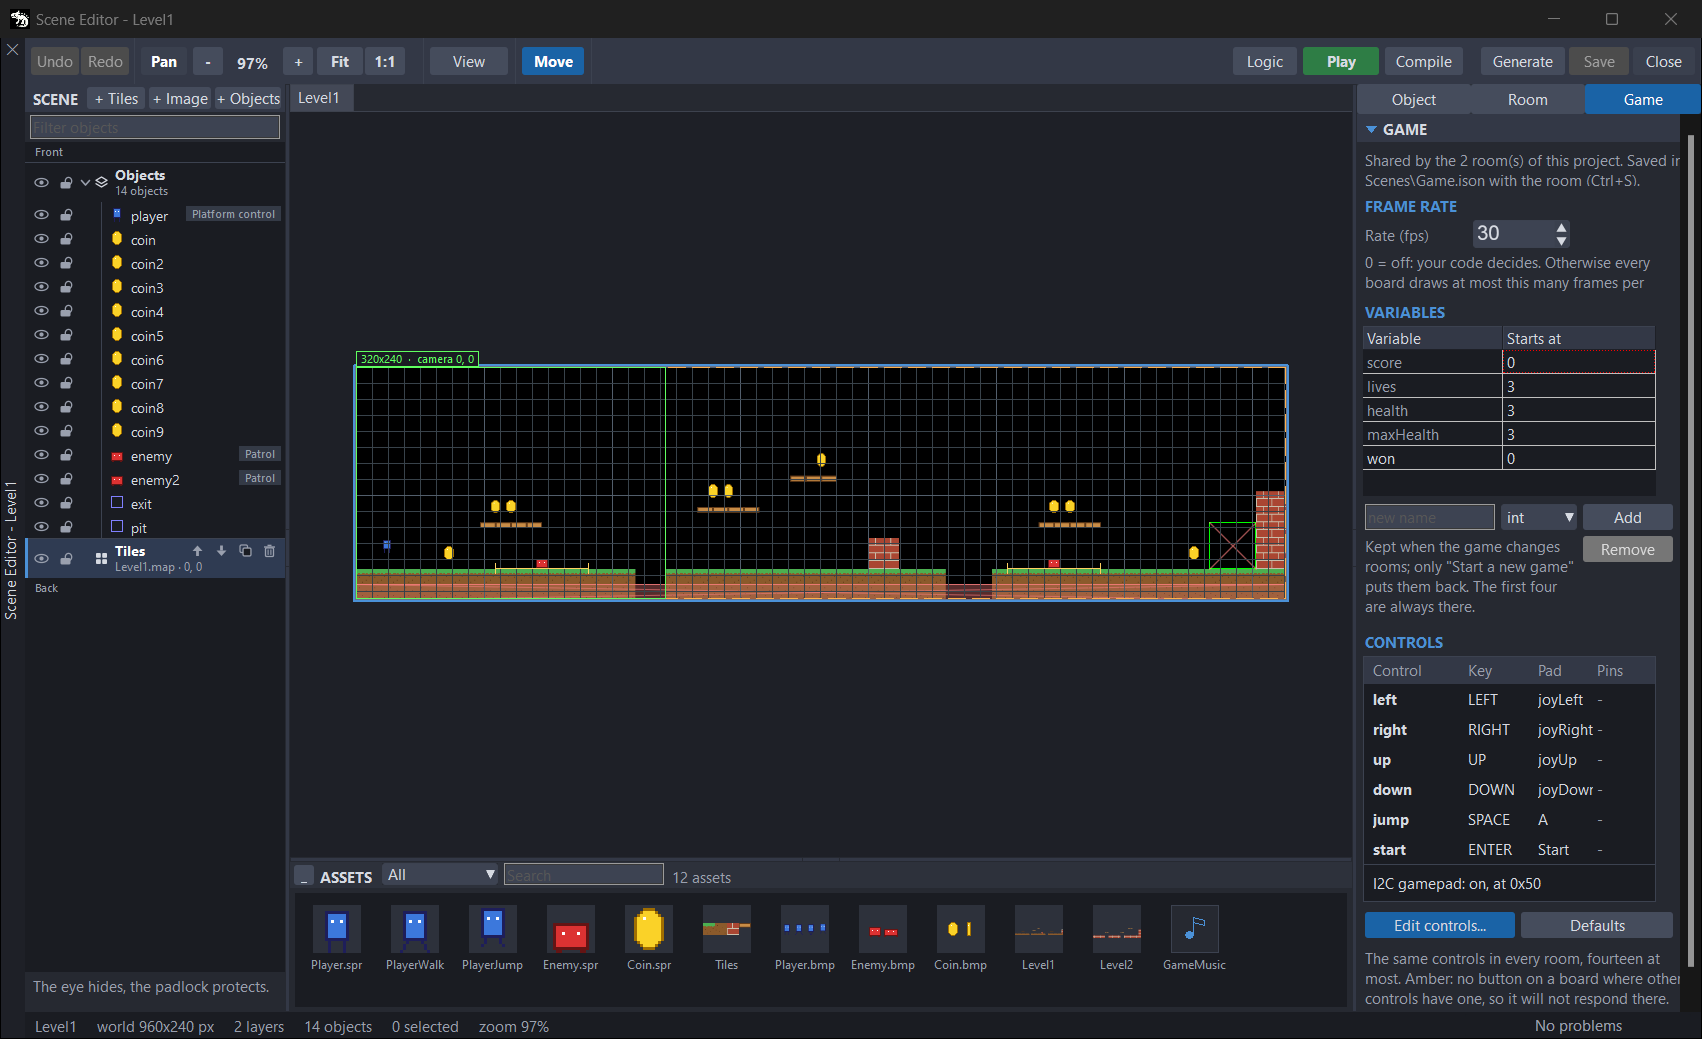
The Game tab of the scene editor keeps what belongs to the whole game and not to one room, in Scenes/Game.json:
- FRAME RATE: Rate (fps) is how many frames per second the game draws at most, the same on Windows and on every board. StarterPlatformer runs at 30. The generated code sets it once, at start-up, with
Display.fps. With 0, your code decides. With physics, 20 or more: below that, the room runs in slow motion. - VARIABLES: the game variables.
score,lives,healthandmaxHealthare always there. StarterPlatformer addswon: the exit of the last room adds 1 to it. The code reads them assceneGame.scoreorsceneGame.lives. What one room leaves in them is what the next one finds. - CONTROLS: the controls of the game, with their key on Windows:
left(LEFT),right(RIGHT),up(UP),down(DOWN),jump(SPACE) andstart(ENTER). The code maps them withSceneInputMap(), once, at start-up. On a board they go with the GPIO of their buttons or with the I2C gamepad: see On the board.
Everything in this tab is in The Game tab.
3. The code the IDE writes
When you save a room, the IDE writes its code in the Code folder: Level1.gen.aru for room Level1, with these functions:
| Function | When | What it does |
|---|---|---|
Level1Load(nil) | When the room starts | Loads the room and returns room, with everything in it. |
Level1FollowCamera(room) | When the room starts | Makes the camera follow player. |
Level1Update(room) | Every frame | Reads the I2C gamepad, runs the behaviours and applies the rules. |
room.scene.update() | Every frame | Moves the physics, the camera and the animations. |
Level1Resolve(room) | Every frame | Pushes the dynamic bodies out of the solid tiles of the collision map. |
Level1Draw(room) | Every frame | Draws the room. |
Two of them are not always there:
Level1Updateonly exists if the room has behaviours, rules, states, templates, room variables or code in some object. The creation code of the room alone is not enough. In a room with none of that, such as an ending screen, do not call it.Level1FollowCameraonly exists if the camera of the room follows an object (Room › CAMERA › Follow).
If you call one that does not exist, the program builds, but it stops when it reaches that line, with the error Undefined variable. All the functions of a room are in The code it generates.
The name of the file and of the functions come from the name of the room (its Name field, in the Room tab), but only with plain letters (no accents), digits and _: spaces and hyphens become _, accented letters and ñ are dropped, and if the name starts with a digit an S goes in front. A room called "Canción" gives Cancin.gen.aru and CancinLoad; a room called "Level 3", Level_3.gen.aru and Level_3Load. To avoid surprises, give your rooms names without spaces or accents.
All of this happens while Room › BUILD › Generate .aru is on, which is how it comes. When it is off, neither saving nor building writes the .gen.aru of that room (if it already had one, it stays as it was), and Play does not play it. It is meant for a half-done room that your game does not import yet. In a room your game imports, leave it on: see the known issues.
SceneRuntime.gen.aru holds what all the rooms share, such as sceneGame, SceneInputMap() and SceneGameReset() (see The shared runtime). The .gen.aru files are not edited by hand: the IDE writes them again when you save and when you build.
4. The game loop
It is the main file of the project, Code/StarterPlatformer.aru. It imports the rooms; when it enters one it loads it (Entrar), and every frame it plays it (Paso):
import "Screen.aru"        // opens the screen: it goes first
import "Level1.gen.aru"
import "Level2.gen.aru"

use Display, Input, Sound

var draw = Display.draw

var sala = ""
var room = nil

func Entrar(nombre)
    sala = nombre
    if (nombre == "Level1") then
        room = Level1Load(nil)
        Level1FollowCamera(room)
    else
        room = Level2Load(nil)
        Level2FollowCamera(room)
    end
end

func Paso()
    if (sala == "Level1") then
        Level1Update(room)
        room.scene.update()
        Level1Resolve(room)
        Level1Draw(room)
    else
        Level2Update(room)
        room.scene.update()
        Level2Resolve(room)
        Level2Draw(room)
    end
end
Screen.aru only opens the screen:
use Display

Display.open(320, 240)
It goes first because an import runs before the first line of the file that imports it, and the imports run in the order they appear. This way the screen gets its memory before the rooms build their tables. Its size, 320 × 240, is the Room › Screen (px) of both rooms.
Why each frame goes in that order is explained in With your own code.
Switching rooms
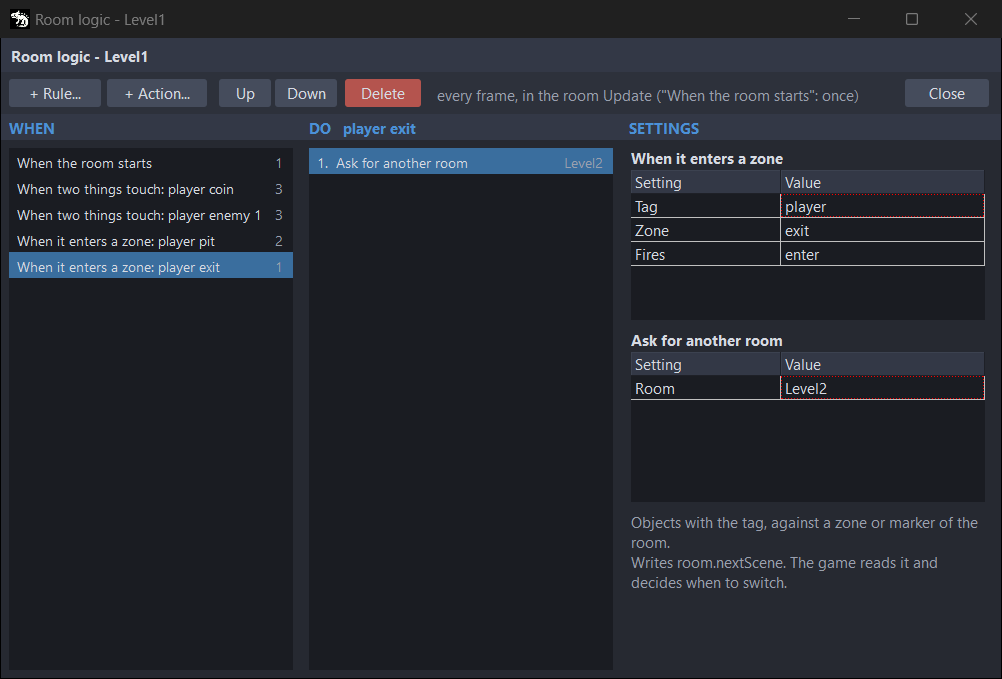
The Ask for another room action of a rule (Actions) does not switch rooms: it writes the name of the room it asks for in room.nextScene. In Level1, the rule of the exit zone asks for Level2. The game loop is the one that switches, when it sees it. This is the gist; in StarterPlatformer it goes inside the JUGANDO state (see Title and end):
Paso()
if (room.nextScene != "") then
    Entrar(room.nextScene)
end
That way the game decides when and how to switch: with a "Level 2" screen in between, saving the game… Asking for (this room), the same room, starts it again after losing a life: that is what the rules of pit and of the enemies do.
Title and end
The title and the end are not rooms: they are states of the loop. StarterPlatformer uses three: TITULO, JUGANDO and FIN. This is its loop, with the constants it uses (in the file it comes with its comments):
const ACT_START = 5             // the start control of the Game tab: Enter on Windows
const ACT_SALIR = 9             // quit: Esc on Windows

const TITULO = 0
const JUGANDO = 1
const FIN = 2

var estado = TITULO
var mensaje = ""

SceneInputMap()                 // the controls of the Game tab
if (platform() == HW_WIN32) then Input.map(ACT_SALIR, "ESC") end

var antes = false
while (not Input.pressed(ACT_SALIR))
    var pulsa = Input.pressed(ACT_START)
    var empieza = pulsa and (not antes)
    antes = pulsa

    if (estado == TITULO) then
        draw.cls(0x000000)
        draw.text(96, 90, "MY PLATFORMER", 0xFFFF00)
        draw.text(100, 140, "Press START", 0xFFFFFF)
        if (empieza) then
            SceneGameReset()        // the game variables, as at the start
            Entrar("Level1")
            estado = JUGANDO
        end
    elsif (estado == JUGANDO) then
        Paso()
        Marcador()                  // the lives and the score, at the top
        if (sceneGame.lives <= 0) then
            mensaje = "GAME OVER"
            estado = FIN
            Sound.stopMusic()
        elsif (sceneGame.won > 0) then
            mensaje = "YOU WIN!"
            estado = FIN
            Sound.stopMusic()
        elsif (room.nextScene != "") then
            Entrar(room.nextScene)
        end
    else
        draw.cls(0x000000)
        draw.text(112, 90, mensaje, 0xFFFF00)
        draw.text(100, 120, "SCORE " + sceneGame.score.toString(), 0xFFFFFF)
        draw.text(100, 160, "Press START", 0xFFFFFF)
        if (empieza) then estado = TITULO end
    end
    Display.update()
end

Display.close()
SceneInputMap()maps the controls of the Game tab. Nobody calls it for you: the game calls it once, before the loop (see How the controls reach the game). On Windows, the game also mapsEscto quit.empiezaistrueonly once for each press ofstart. The loop works it out withantes, instead of usingInput.justPressed.- On the title screen,
SceneGameReset()puts every game variable back to its start value,wonincluded. - The rules of the rooms change the variables, and the loop decides. Lose a life takes one life away, and the rule of the
exitzone of Level2 adds 1 towon(Change a variable). With no lives left, the game says "GAME OVER"; withwonabove 0, "YOU WIN!".
Adding a room
This is how you add Level3, after Level2:
-
Create the room. Open Level2 in the scene editor. In the explorer, right-click Scenes, choose New Scene and type
Level3. The new room copies the Room settings of Level2: the sizes, the screen, the music, the camera, the physics, the collision values with Tile numbers, and Generate .aru. It does not copy the collision map, whom the camera follows, the room variables or the creation code. It starts with aTileslayer with no map, an emptyObjectslayer and no rules. See Creating and opening a room. -
Draw it.
- Make its map with New TileMap, with the tileset
Images/Tiles.bmp(see the tilemap editor). Choose it in theTileslayer (Tilemap), and the room takes its size. Choose it also in Room › Collision map: without a collision map, the player falls through the floor. - Copy the objects of Level2 with
Ctrl+Cand paste them in theObjectslayer of Level3 withCtrl+V: they land in the same place, with their behaviours. Then move them wherever you want. - In Room › CAMERA › Follow, choose
player. - Copy the rules of Level2, one by one: in its Room logic, click the WHEN list, choose a rule and press
Ctrl+C; in the one of Level3,Ctrl+V. See Copying rules between rooms. - Save it with
Ctrl+S: the IDE writesCode/Level3.gen.aru.
- Make its map with New TileMap, with the tileset
-
Call it from the loop. In
StarterPlatformer.aru, the three places are marked with aROOMScomment. Addimport "Level3.gen.aru"next to the other two, and a branch inEntrar()and another inPaso(). The one of Level2 is theelse: turn it into anelsifand leave theelsefor Level3.func Entrar(nombre)
sala = nombre
if (nombre == "Level1") then
room = Level1Load(nil)
Level1FollowCamera(room)
elsif (nombre == "Level2") then
room = Level2Load(nil)
Level2FollowCamera(room)
else
room = Level3Load(nil)
Level3FollowCamera(room)
end
endIn
Paso(), the same:elsif (sala == "Level2") thenand anelsewith the four calls of Level3. Only call the functions the room has: see The code the IDE writes. -
Ask for the new room. In the Room logic of Level2, the rule of the
exitzone adds 1 towon, and that wins the game. Choose it, delete its action with Delete and, with + Action..., add the Ask for another room action, withLevel3in Room. Theexitrule you copied into Level3 is now the one that adds towon.
On the board
The same game runs on an ESP32 board. The usual steps are in Your program on a board: add your board to the project with Manage boards..., in the Target menu; flash the VM firmware of this version with Flash Firmware; Run, and Open Serial to see what it says. Here is what changes for this game.
The buttons of the board
On Windows, each control is a key. On a board, each control needs the GPIO of a button or the I2C gamepad; the ESP32-S31 also reads a USB keyboard. The controls of StarterPlatformer bring no GPIO: they bring the gamepad (see below). To play with the buttons of your board:
- Add your board to the project and choose it in Target.
- In the Game tab of the scene editor, press Edit controls.... The Game controls window opens.
- Choose each control and type the GPIO of its button in BUTTONS ON THE BOARD (GPIO), in the row of your board family. You need at least
left,right,jumpandstart. - If you do not have the gamepad, turn it off: press Gamepad on, in the same window, and it becomes Gamepad off.
- Save with
Ctrl+Sin the scene editor and press Run.
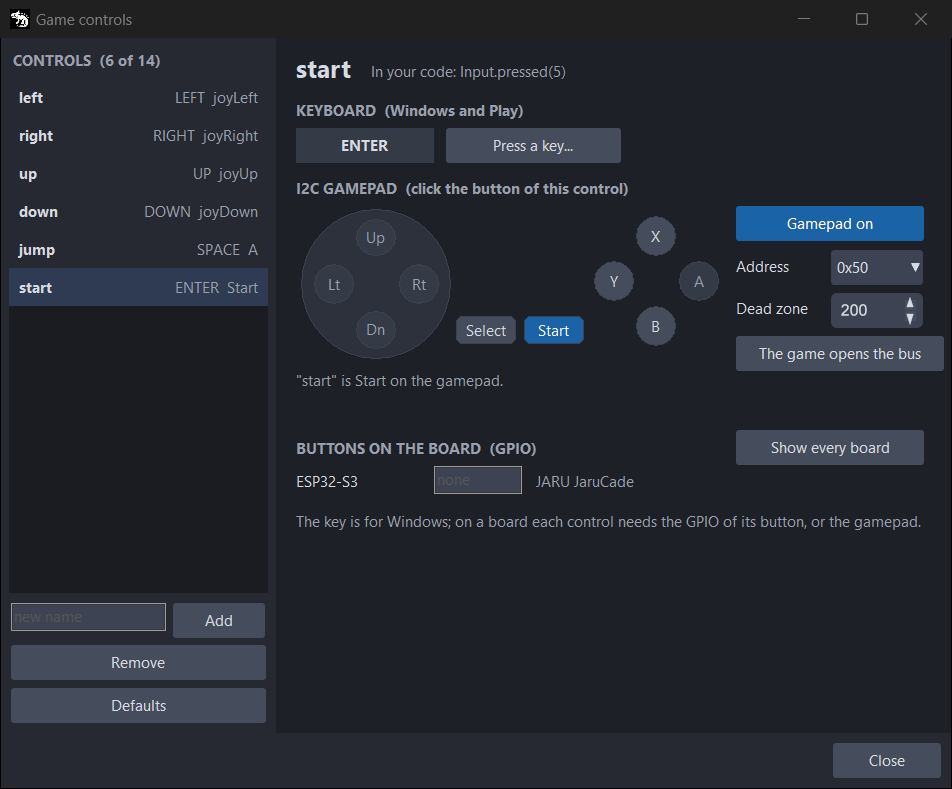
Which GPIO each button is depends on your board. The whole window is in The Game controls window.
With no GPIO and no gamepad, the game starts with no input and stays on the title screen. With Open Serial, the Output says so: Controls: no gamepad and no GPIO buttons for this board in Game > Controls, so no input. With your board in Target, the problems panel of the scene editor warns about it too.
On the board there is no key to quit: Esc is only mapped on Windows, and the loop never ends.
The I2C gamepad
StarterPlatformer comes with the Adafruit I2C gamepad (Mini I2C Gamepad) on, at address 0x50, with its driver in Code/Drivers/DRV_SEESAW_GAMEPAD.aru. The joystick moves, A is jump and Start is start.
The gamepad starts on the boards whose profile has the pins of the I2C bus (Config › Platform › ESP32, I2C Bus group). The template brings the JARU JaruCade profile: an ESP32-S3, with SDA on GPIO 11 and SCL on 10. If the project has no profile of the chip of your board with I2C pins, the board says so at start-up: Gamepad: no I2C pins for this board in Config > ESP32, so no gamepad. Everything about the gamepad is in The I2C gamepad.
Each room reads the gamepad in its <Room>Update, but the title and the end are not rooms. On a board that only has the gamepad, Start does nothing on the title screen, and the game does not start. Read it yourself outside the rooms, with SceneInputRead() at the beginning of the loop:
while (not Input.pressed(ACT_SALIR))
    if (estado != JUGANDO) then SceneInputRead() end    // outside the rooms
    var pulsa = Input.pressed(ACT_START)
SceneInputRead() only exists if your code names it: the next Build writes it in SceneRuntime.gen.aru.
When it is on, the game opens the I2C bus of the board at start-up, and on the ESP32-S31 that has a drawback: if the gamepad does not answer and no control has a GPIO, the game does not use the keys of the USB keyboard and is left with no input.
The Gamepad on button of the Game controls window turns it off for the whole game: it becomes Gamepad off.
All the known issues of JARU, together, are in Known issues.
The sound
The sound only comes out after Sound.init(), on Windows too. Each room that makes sound calls it when it loads, and StarterPlatformer also calls it at the beginning of the main file: that way, what your code plays outside the rooms, such as on the title screen, sounds too. Calling it again does nothing. See Music.