I2C drivers
An I2C driver is an .aru file with a class that talks to a chip on the I2C bus: a sensor, a clock, an audio codec, a gamepad… The driver manager (I2C Driver Manager) keeps your driver library: it shows you each driver's details, copies it into your project and writes the code to start using it. It also creates new drivers, from a template or with the help of an AI.
Open it with Home › View › I2C Controller, on the ribbon. It's an IDE window like any other: you can dock it wherever you like.

Version 0.9.7 comes with six drivers:
| Driver | What it is | Type |
|---|---|---|
| AXP2101 | The power management chip of the T-Watch S3. | PMU |
| PCF8563 | A clock with alarm and calendar. | RTC |
| BMP280 | A pressure and temperature sensor (see Known issues). | Sensors |
| MAX30102 | A pulse and blood oxygen sensor. | Sensors |
| ES8311 | An audio codec. | Audio |
| SeesawGamepad | The Adafruit Mini I2C Gamepad. | Input |
A walkthrough
Reading the MAX30102 sensor from your project.
- Open a code file of the project in the editor, for example the main one, and put the cursor at the very top. The manager writes into the file you have in view, wherever the cursor is.
- Open the manager with Home › View › I2C Controller.
- Pick the driver. In Device Types, click Sensors, and in the list, MAX30102. The Info tab shows its details: the version, the file, the author, the chip and its I2C address.
- Check the pins. In the Code tab, Port, Pin SDA and Pin SCL come from the I2C bus of the project's board, if it has one. Change them if your wiring is different: the example code (Example of Use) changes with them.
- Press Inser Driver. The IDE copies the driver to
Code/Drivers/DRV_MAX30102.aru, adds it to the explorer and writesimport "Drivers/DRV_MAX30102.aru"at the cursor. - Put the cursor below and press Copy Code. The IDE writes the example from the Code tab. Delete its
import "drivers/…"line: that's the driver's path in the library, not in the project (see Known issues). - Compile it and take it to the board. On Windows there's no I2C bus: the program runs, but the sensor doesn't answer (see "From code").
The library
The library is the %LOCALAPPDATA%\JaruIDE\DriversI2C folder (see "What it saves").
Device Types and the list
Device Types, on the left, are the driver types, with how many there are of each: All drivers, PMU (power), RTC (clock), Sensors, Display, Radio, Audio, Input (gamepads and keyboards) and Miscellaneous. Click one and the Drivers list shows its drivers, with their name, description and version.
The box at the top right, the one with the magnifying glass, searches as you type in the name, description and chip of every driver, whatever type is picked, and ignoring case. If you empty it or pick another type, the type's list comes back.
Refresh reads the library folder again. Use it if you have copied, changed or deleted drivers by hand.
Info and Methods
- Info holds the driver's details: Version, File (the file name), Type, Author, the Chip with its address (Addr, in hexadecimal and in decimal) and the description.
- Methods lists its methods: the name with its parameters, what it returns (Returns) and what it does (Description). Double-click one and the IDE writes the call in the editor, at the cursor, with the instance in Instance Name:
sensor.setLedPower(redPower, irPower).
Code
At the top, I2C Configuration says which bus the example code starts:
- Port: the bus,
0or1(I2C.PORT0orI2C.PORT1). - Pin SDA and Pin SCL: the bus pins.
- Instance Name: the name of the driver's variable. By default, the type's (
pmu,rtc,sensor,displayorradio) or, for the rest, the driver's name in lowercase (es8311).
Port, Pin SDA and Pin SCL come from the I2C bus of the project's active board, if it has the pins (Config › ESP32, I2C Bus group). If not, from the ones the driver gives (@default_sda and @default_scl, see "What it saves"), and if it doesn't give any either, bus 0 with pins 10 and 11.
Below, Example of Use is the driver's example code, with those values filled in. You can touch it up before pressing Copy Code, but if you change a value above, the example is written again and you lose your changes.
Using a driver in the project
The two buttons at the bottom write into the code editor: into the file you have in view and wherever the cursor is. With no code file open they do nothing, and they tell you so.
- Inser Driver, or a double-click in the list, copies the driver file to the project's
Code/Driversfolder (creating it if needed), adds it to the explorer and writesimport "Drivers/<file>"at the cursor. If the project already has that file, it asks whether to replace it; if you say yes, it copies over it and doesn't write theimport, which you'll already have. - Copy Code, despite its name, doesn't copy to the clipboard: it writes the example from the Code tab at the cursor.
The import "Drivers/…" is relative to the file you write it in: it works for the files in the Code folder. The project's driver is a copy: you can change it without touching the library's one. To bring back the library's one, press Inser Driver again and accept replacing it.
The rooms' I2C gamepad uses the SeesawGamepad driver: the scene editor copies it to Code/Drivers by itself (The I2C gamepad).
Creating a driver
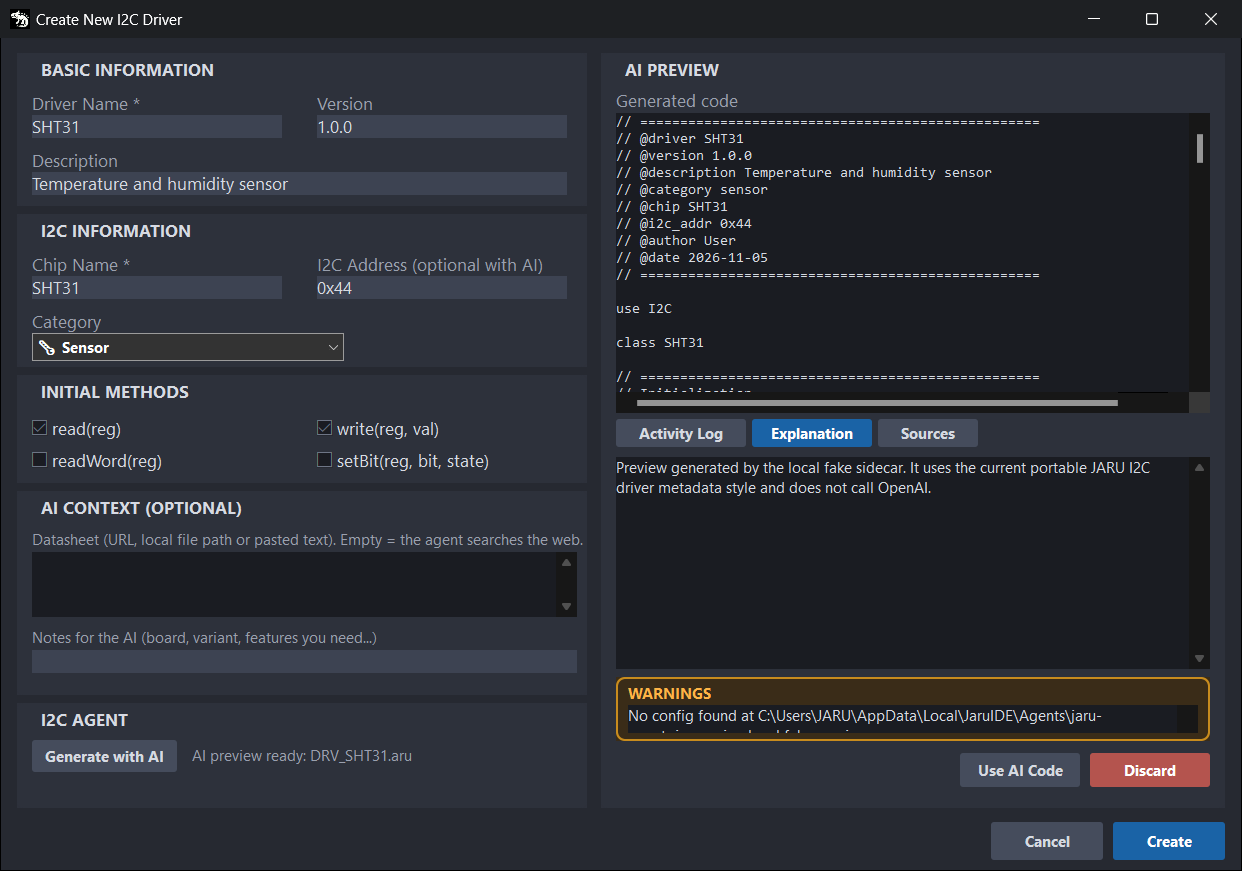
New Driver opens Create New I2C Driver, the form for a new driver. Without AI, it writes a template with the basics: the class, the address and the methods to read and write registers. You write the rest.
- In BASIC INFORMATION:
- Driver Name *: the class name, with letters, digits and
_, not starting with a digit; - Version:
1.0.0by default; - Description.
- Driver Name *: the class name, with letters, digits and
- In I2C INFORMATION:
- Chip Name *: the chip. When you type the name, the IDE copies only its first letter here: fix it;
- I2C Address (optional with AI): the address, in hexadecimal with
0x(0x76) or in decimal (118); - Category: the type, PMU (Power Management), RTC (Real Time Clock), Sensor (the default), Display, Radio, Audio or Other, which goes to Miscellaneous.
- In INITIAL METHODS, the template's methods: read(reg) and write(reg, val), ticked by default, readWord(reg) and setBit(reg, bit, state).
- Press Create.
The IDE writes DRV_<NAME>.aru, with the name in uppercase, into its type's folder inside the library (sensor, pmu…), and the manager lists it. If the file already exists, it asks whether to replace it. Cancel closes the form without creating anything.
The template has the header with the form's data and @author User, an init(i2c_port) that stores the port and the address, the ticked methods, a sample method, ejemplo(), that reads register 0, and the example code. Complete it with your chip's registers and methods: in the project's copy, after Inser Driver, or in the library file, with any text editor. The manager reads the changes when you press Refresh.
Generating a driver with AI
The same form generates the driver with an AI: it looks for the chip's datasheet on the web and writes a driver with the methods you'd expect from that chip (reading a sensor's temperature, setting a clock's time…). You review it before saving it.
The provider
The AI comes from a provider, with your key: OpenAI or Gemini. You pick it in Config › IDE › Settings, in the AI Agents group (Settings).
By default, the provider is fake: it doesn't call any AI, and what you get is a template, in English, similar to the one from Create. With OpenAI or Gemini but no key, or if the provider fails (no connection, no credit…), you also get that template, and the warnings say why.
Generate with AI
- Fill in the form as for Create. The address can stay empty: the AI looks for it.
- If you like, in AI CONTEXT (OPTIONAL):
- Datasheet: the datasheet's web address, the path of a file on your PC (PDF or text) or the datasheet's text, pasted. Empty, the AI looks for it on the web.
- Notes for the AI: your board, the chip variant, what you need from the driver… If you name the board, the AI looks for its I2C pins.
- Press Generate with AI. It can take a few minutes. The IDE keeps working, and under I2C AGENT you see where it's at. Meanwhile, the form can't be closed. If there's no answer within 10 minutes, it gives up.
- The result shows in AI PREVIEW: the code, in Generated code, and below it, three views: Explanation (what the driver does and its methods), Sources (the pages it used) and Activity Log (the steps). WARNINGS tells you what to check: several possible addresses, errors that couldn't be fixed, whether you got the template…
- Press Use AI Code to keep the code, or Discard to throw it away. If the address was empty, Use AI Code fills in the one the AI found.
- Press Create. It saves the AI's code, like a driver created without it. If you changed the form after generating, it asks whether to save it anyway.
With OpenAI or Gemini, the agent:
- reads the datasheet you gave it;
- searches the web for the datasheet, code from other drivers, the I2C address and, if the notes name the board, its pins;
- if you gave it no datasheet, downloads up to three of the pages it found;
- writes the driver, checks it and, if it has errors, sends it back to the AI to fix them, up to twice;
- if it found your board's pins, notes them in the driver (
@default_sdaand@default_scl).
What it sends and where
- With
fake, nothing leaves your PC. - With OpenAI, the agent talks to
api.openai.com; with Gemini, togenerativelanguage.googleapis.com. Always with your key. - It sends them the form's data (name, chip, address, type, description, version and methods), your notes, the datasheet's text (up to 80,000 characters) and what it found on the web. Nothing from your project.
- If you give the path of a file, the agent reads it and sends its text, and the path too.
- The datasheet you give by its web address and the pages it finds, the agent downloads straight from their websites. It keeps them in
%LOCALAPPDATA%\JaruIDE\Agents\cache\datasheetsand doesn't download them again.
To stop the agent from searching the web, add "web_research_enabled": false to the AI Agents file, %LOCALAPPDATA%\JaruIDE\Agents\jaru-agents.json. Then it only uses what you give it: the form, your notes and the datasheet.
Import and export
In 0.9.7, Import and Export open the dialog to pick a file, but they only show a message with its name: they don't copy anything.
In the meantime, do it by hand:
- To import a driver, copy its
.aruinto the library folder, or into its type's folder inside it, and press Refresh. - To export it, copy its
.arufrom the library folder. Info › File tells you its name.
What it saves
The library is the %LOCALAPPDATA%\JaruIDE\DriversI2C folder (C:\Users\<you>\AppData\Local\JaruIDE\DriversI2C). It holds one .aru per driver, at the top or in its type's folder (audio, input, pmu, rtc…). The manager reads every .aru inside, in any folder.
- When it starts, the IDE copies into the library the drivers of the installation you don't have. It doesn't replace the ones you already have, even if you changed them.
- The manager notes what it reads in
drivers.cache.json, in the same folder, to open faster. If there are new or changed files, it reads everything again when it opens, or when you press Refresh.
A driver is a JARU class with a comment header the manager reads:
// @driver MySensor
// @version 1.0.0
// @description A sample sensor
// @category sensor
// @chip MS01
// @i2c_addr 0x48
// @author Me

use I2C

class MySensor

    def init(i2c_port)
        this.port = i2c_port
        this.addr = 0x48
    end

    // @method readValue
    // @returns int The value of register 0
    // @desc Reads the data register
    def readValue()
        return I2C.readReg(this.port, this.addr, 0x00)
    end

end

// @example
// use I2C
// import "Drivers/DRV_MYSENSOR.aru"
//
// I2C.init({{PORT}}, {{SDA}}, {{SCL}}, 100000)
// var {{INSTANCE}} = {{CLASS}}({{PORT}})
// println({{INSTANCE}}.readValue())
// @endexample
The header tags go before the class line:
| Tag | What it is |
|---|---|
@driver | The driver's name, which is its class's. Required: without it, the manager doesn't list the file. |
@i2c_addr | The I2C address, 0x48 or 72. Required. |
@version | The version. Without it, 1.0.0. |
@description | The description in the list and in Info. |
@category | The type: pmu, rtc, sensor, display, radio, audio, input or misc. Without it, or with another one, the driver only shows in All drivers. |
@chip | The chip. Without it, the driver's name. |
@author | The author, in Info. |
@default_sda, @default_scl | The board's pins for the example in the Code tab. The AI writes them when it confirms your board. |
@date, @hardware, @url | Notes for you: the manager doesn't show them. |
Methods lists the class's defs. With @method <name>, @returns and @desc above, it also shows what each returns and what it does. init, read, write, readWord and setBit only show if they have a @desc.
The example code goes between // @example and // @endexample, commented out. The manager removes the // and replaces {{PORT}}, {{SDA}}, {{SCL}}, {{INSTANCE}} and {{CLASS}} with what's in the Code tab. {{PATH}} becomes the driver's path in the library, not the project's: write the import with the path Inser Driver uses, as in the example above. If the driver has no @example, the manager writes a basic one: the import, I2C.init and the instance.
From code
A driver is a class: you open the bus with I2C.init, create the driver with the port and call its methods.
use I2C
import "Drivers/DRV_MAX30102.aru"

I2C.init(I2C.PORT0, 21, 22, 400000)   // port, SDA, SCL and frequency
var sensor = MAX30102(I2C.PORT0)
var data = sensor.readSensor()        // [red, infrared], or nil if there's no new data
if (data != nil) then
    println(data[0])
end
The bus functions, their errors and the platforms are in I2C. On Windows, the I2C module is a stand-in: writing always succeeds and reading gives 0. Test the driver on the board.
Known issues
- The button reads "Inser Driver". It's the one that puts the driver in the project (Insert Driver).
- Import and Export do nothing (see "Import and export").
- The example's
importisn't the project's. In the Code tab,{{PATH}}becomes the driver's path in the library, likedrivers/rtc/DRV_PCF8563.aru. With the drivers in a type folder, like the factory PMU, RTC and Audio ones, the program doesn't compile: "Imported file not found". Delete that line and keep the one from Inser Driver. - The PCF8563 example, if you already had JARU installed. The IDE doesn't change the drivers already in your folder (
%LOCALAPPDATA%\JaruIDE\DriversI2C), so your copy of the PCF8563 still keeps the time in a variable calledtime, andtimeis a JARU function: "'time' is a native function name". Rename it, for example tohora. - The factory BMP280 is just the template. It reads and writes registers, but it can't read the pressure or the temperature.
- Chip Name keeps the first letter of the name. When you type Driver Name with Chip Name empty, the IDE copies the first letter into it, and that's what the AI would look for. Fix it before pressing Create or Generate with AI.
- The pins the AI writes are lost when you reopen the manager. The cache doesn't keep
@default_sdaor@default_scl: until you press Refresh, the Code tab uses pins 10 and 11. It only happens if the project's board has no I2C bus. - Untranslated text. The Create template and the basic example in the Code tab have their comments in Spanish, as do the BMP280, MAX30102 and PCF8563 examples. The rest of the IDE is in English.
All the known issues of JARU, together, are in Known issues.