Flash the firmware and run
To run your programs, the board needs two things: the JARU VM, which Flash Firmware writes once for each version of JARU IDE, and the program's files, which Run writes every time you run it.
| In the board's flash memory | Written by |
|---|---|
| The bootloader | Flash Firmware |
| The partition table, which says where each thing goes | Flash Firmware, Run and Upload Program |
| The JARU VM | Flash Firmware |
The file memory (LittleFS): the program, its resources and the boot.cfg | Run and Upload Program |
The IDE writes to boards with esptool, through the port of the project's board. Before each write, it reads the size of the board's flash and makes the partition table with it: the file memory goes from the end of the VM's space to the end of the flash. What fits in it, in Memory and limits.
The first-time walkthrough is in Your program on a board. This page covers each step in full.
The Deploy page
Flash Firmware and Upload Program are on the Deploy page of ESP32 Tools (Build › Target › Manage boards..., and Deploy, under Actions).
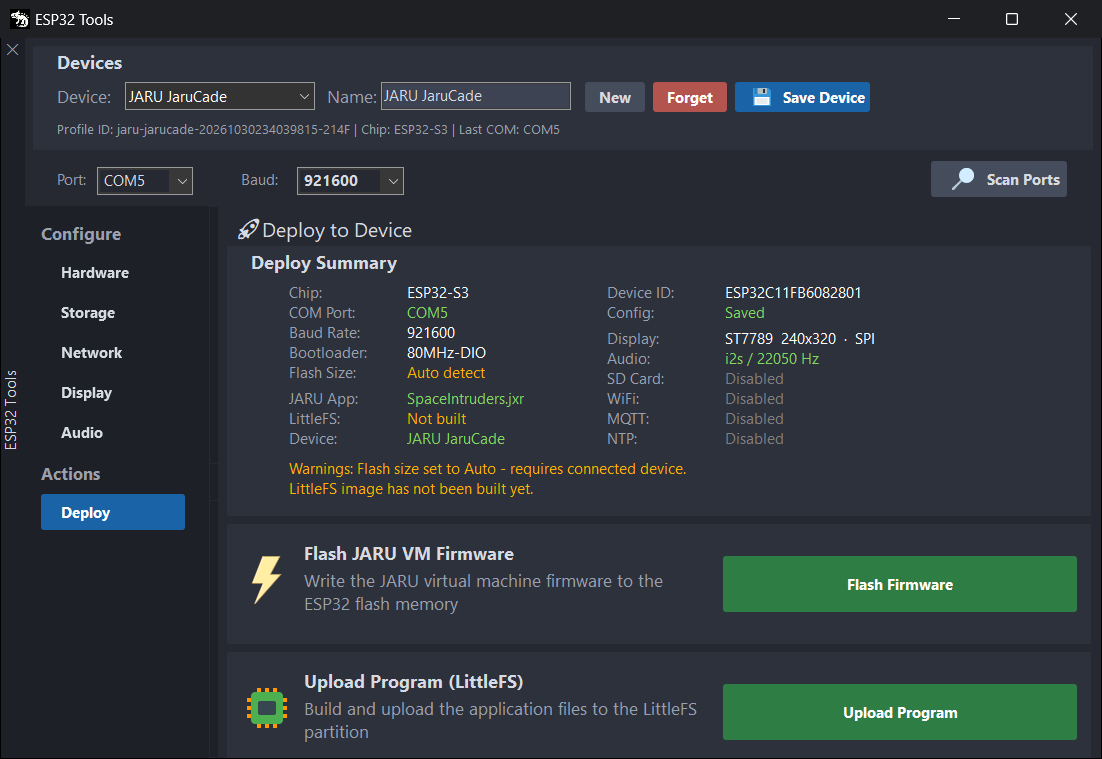
At the top, Deploy Summary sums up what the project's active board is going to be written with:
| Field | What it is |
|---|---|
| Chip, COM Port, Baud Rate, Bootloader and Flash Size | What it is written with: the chip, the port, the speed, the bootloader (Flash Mode) and the flash size. |
| JARU App | The program the board will start: the .jxr of the project's main file. |
| LittleFS | Image built if the image of the files has been prepared at least once, with the size of the file memory, or Not built. |
| Device and Config | The project's board, and whether it has unsaved changes (Modified) or not (Saved). |
| Device ID | The device's name (Device Name). |
| Display, Audio, SD Card, WiFi, MQTT and NTP | What the board has. |
Below, in orange, the warnings: what is missing or doesn't add up, like a port not chosen, a display pin not set, or MQTT or NTP without WiFi. With no warnings, it says "Configuration looks ready for deployment.". The warnings don't stop you from writing to the board.
Flash Firmware
Flash Firmware writes to the board the JARU VM for its chip, the one that comes with your JARU IDE installation, with its bootloader and its partition table. It doesn't write the files: Run writes the program and the boot.cfg.
- Click Flash Firmware. If the serial monitor is open on the board's port, the IDE moves it aside while it writes ("Serial monitor paused: the IDE is using COM5.", with your port).
- The IDE reads the board ("Validating flash configuration..."): it writes its chip, its flash and its MAC to the Output, and puts the size it has read in Flash Size. If it can't read it, it uses the one in Flash Size; if that is Auto detect, it stops ("Flash operation cancelled.").
- It makes the partition table for that size ("Partition table generated").
- With esptool, it writes the Flash Mode bootloader, the table and the VM. The Output tells you how it goes ("Flashing in progress... 45%") and, at the end, checks what was written ("Verifying flash contents, please wait...").
- If all goes well, it says "JARU VM firmware successfully saved."; if not, "Error: failed to save JARU VM firmware.", and the esptool lines above say why.
- The board restarts, and the serial monitor opens again if it was moved aside.
The VM comes from JARU IDE's Compiler\ESP32 folder, which has one folder per chip (ESP32, ESP32S3, ESP32P4 and ESP32S31) with the VM in firmware\firmware.bin. You change that folder in Settings, in ESP32 VM (see The paths).
If your board came with a factory program, or one of yours written with another tool, Flash Firmware replaces it with the JARU VM. JARU IDE doesn't keep a copy of what was there.
- MCU model has to be your board's chip: with another one, esptool doesn't write to it.
- Flash Firmware doesn't ask about ESP32 Tools' unsaved changes: it writes with what you see in the window.
- If writing fails, try a lower speed in Baud.
Upload Program
Upload Program writes the project's files to the board, like step 3 of Run, but:
- It doesn't build: it sends whatever is in
Build/flash, as it is. If the compiled program doesn't match the Line numbers checkbox, it only warns about it ("Press Compile to rebuild it."). - It doesn't check that the board carries the VM. On a board without it, it leaves the board restarting.
- It doesn't move the serial monitor aside. If it is open on that port, esptool can't use it: close it first.
Otherwise, it does the same as Run: it asks whether to save ESP32 Tools' changes, generates the boot.cfg, reads the flash size, prepares the image of the files and writes it. When it's done it says "PROCESS COMPLETED: LittleFS successfully built and saved.".
Use Run: it builds whatever is needed and checks the board. Upload Program is for sending Build/flash without building.
Run on the board
With a board in Build › Target, Run builds the program if needed and sends it to the board, which starts it. The Output starts with "[ESP32] Sending the program to", the board's name and "(interpreted)".
Before sending anything:
- It builds if the program isn't built, if you have saved code, images, sprites, maps or music after building it, or if it isn't built as Line numbers asks.
- If ESP32 Tools has unsaved changes, it asks ("The ESP32 configuration has unsaved changes"). Answer Yes: with No, the
boot.cfgcomes from the board as you last saved it, not from what the window shows. It happens almost always with Flash Size on Auto detect, because the IDE writes into it the size it reads from the board. - It needs a port. Without one: "Error: No COM port configured. Please open ESP32 Tools and select a port.".
- It generates the
boot.cfgof the active board (see Theboot.cfg). - It moves the serial monitor aside if it is open on that port, and opens it again when it's done.
Then the Output reports the three steps.
Step 1: the files
"Step 1 of 3: building the files for the board". The IDE:
- Reads the board: its chip, its flash and its MAC, and the flash size ("Flash size detected: 16 MB", for example). If it can't read it, it warns ("Warning: Could not auto-detect flash size.") and uses Flash Size; if that is Auto detect, it stops ("Error: Cannot determine flash size").
- Makes the partition table for that size.
- Deletes from
Build/flashthe debug files (.jxd) and the scene editor's Play programs (_Play_*.jxr): on the board they would only take up space. - Puts everything in
Build/flashinto an image of the file memory: the compiled program, its resources and theboot.cfg. If it doesn't fit, it stops here.
The table and the image stay in Build/Deploy, in the project.
Step 2: the board check
"Step 2 of 3: checking that the board carries the JARU VM". The IDE reads the beginning of the board's flash, the bootloader and the partition table, and compares it with what it is going to write. If it matches, it says "The board carries the JARU VM.".
If it doesn't match, the board doesn't carry the VM: it is empty, carries another program, its partition table isn't the VM's or its bootloader is for another flash size. Then Run asks what to do before writing anything, in the Run on the board window, which says why:
| Button | What it does |
|---|---|
| Yes | Writes the VM first, like Flash Firmware, and then the program. This is what you want. |
| No | Writes the program anyway. Without the VM, the board keeps restarting. |
| Cancel | Writes nothing ("Run cancelled: nothing was written to the board."). |
If it can't read the board, it doesn't check it and carries on: "Could not read the board to check it: sending the program anyway.".
This check doesn't look at the VM's version: it accepts a board with the VM of an earlier version (see When you change version).
Step 3: writing
"Step 3 of 3: writing the program and its files to the board". The IDE writes the partition table and the image of the files. Erasing the space for the files takes a while: meanwhile, the Output writes a line every 10 seconds ("... still working, 20 s so far").
When it's done it says "DEPLOYMENT COMPLETED: LittleFS successfully built and flashed.". The board restarts and starts your program. What it prints doesn't show up in the Output: to see it, open the serial monitor (Open Serial).
Step 3 rewrites the board's whole file memory, not just the program. Anything your program saved there is lost with every Run, and with Upload Program too.
Also:
- The program stays on the board until you send it another one, and starts by itself every time the board powers up. When it ends, the VM starts it again.
- Stop doesn't stop it: it only stops programs running on Windows.
- Debug doesn't go to the board: it always debugs on the Windows VM.
Open Serial
What your program prints on the board comes out through its serial port. To see it, open the serial monitor: Open Serial, in the Output toolbar. Run doesn't open it.
- The port: if Target is a board and you haven't picked another one in Port, Open Serial uses the board's.
- The speed: Speed has to be 115200, the speed the VM writes at on every board. Baud, in ESP32 Tools, is something else: the speed at which esptool writes to the board.
- If the board restarts and its port disappears, the monitor says so ("COM5 is gone (the board is restarting?)…") and opens it again when it comes back.
- While the IDE writes to the board, with Run or Flash Firmware, the monitor moves aside and comes back when it's done.
- It only receives: it doesn't send what you type to the board. A program waiting on
readLine()keeps waiting (see Memory and limits). - If another program has the port, it doesn't open: "Error opening COM port:", with the reason.
To close it, click Close Serial, which is the same button. The whole toolbar, in The Output and the serial monitor.
Every time it starts, the VM writes some lines of its own before your program's. Some of them tell you where it is:
| Line | What it means |
|---|---|
| "** Copyright (c) 2026 JARU Project." | The JARU VM is starting. |
| "Boot config file loaded." | It has read the boot.cfg. |
| "> Loading program: SpaceIntruders.jxr", with your program | It loads the program the boot.cfg names. |
| "Valid JARU program, version 0.9.7" | The program is a JARU program, of that version. |
| "ESP32 0.9.7…", in the JARU VM banner | The version of the board's VM. It starts with "ESP32" whatever the chip. |
If the program gives an error, the monitor shows it and, if Line numbers is on, says on which line.
When you change version
Each version of JARU IDE comes with its VM, and a program compiled with a new version needs that version's VM. After updating JARU IDE, click Flash Firmware on each board before sending it programs, and build your projects again (see Upgrading from 0.9.6).
Its step 2 only checks that the board carries the JARU VM, whatever its version. On a board with the 0.9.6 VM, a program compiled with 0.9.7 starts and stops at the first new instruction, with the error "Unknown Opcode encountered". Flash the firmware first.
To know which VM a board carries, open the serial monitor: the JARU VM banner says its version on the line that starts with "ESP32" ("ESP32 0.9.7…" in 0.9.7), and "Valid JARU program, version …" says the program's.
| The board carries | The program is from | What happens |
|---|---|---|
| The 0.9.6 VM | 0.9.7 | It starts and stops with "Unknown Opcode encountered". |
| The 0.9.7 VM | A newer version | It doesn't load it: "Error: Program version … uses bytecode newer than this VM", which asks to "Update the firmware from the IDE". |
In both cases, the fix is the same: Flash Firmware with the JARU IDE that compiled the program, and then Run.
If the board does not start
Look first at the Output and, if the IDE got as far as writing, at the serial monitor.
What the Output says:
- "Error: No COM port configured. Please open ESP32 Tools and select a port.", with Run, or "No COM port has been selected. Please select a valid COM port to proceed.", with the ESP32 Tools buttons. The board has no port. In ESP32 Tools, click Scan Ports, choose your board's in Port and click Save Device.
- "Error: no active ESP32 device profile selected." The project has no active board, for example after removing it with Forget. Choose one in Build › Target, or save one with Save Device.
- The "Target not available" window. The board in Target is no longer in the project. Choose another one in Build › Target.
- "Error: Cannot determine flash size", or "Warning: Could not auto-detect flash size." and "Could not read the board to check it". The IDE couldn't read the board. Check that it is connected and that Port is its port: click Scan Ports again. If the serial monitor is open on that port, close it.
- "DEPLOYMENT FAILED: Error during LittleFS build." The image of the files couldn't be made. If it's because they don't fit, Check Storage, on the Storage page, tells you how much they take up (see Memory and limits).
- "DEPLOYMENT FAILED: Error while flashing LittleFS.", "Error: failed to save JARU VM firmware." or "PROCESS FAILED". esptool couldn't write to the board, and its lines, above, say why. Check the port and the cable, and that no other program, nor the serial monitor with Upload Program, has the port open.
What the serial monitor says:
- “File "boot.cfg" not found. System halted.” The board carries the VM, but no program yet: click Run.
- "Boot config format fail. System halted." The board's
boot.cfgis badly written. Run generates it again. - “boot.cfg has no "jaru_app" in its "jaru" section…”, every 5 seconds. The project has no main file, so the
boot.cfgdoesn't say which program to start. Choose it in the Main File list, at the top of the explorer (see The Main File), and click Run. - "Please insert an SD card to boot.", every 2 seconds. The board has the SD card turned on (Storage › SD Card) and the VM can't find it: insert the card, check its pins or turn it off, and click Run.
- "> Error: The file … could not be found." and "> Halted, press enter to reboot !!!". The board doesn't have the program its
boot.cfgasks for, for example after an Upload Program without building. The serial monitor doesn't send keys: click Run, which builds and sends the program. - "Unknown Opcode encountered" or "Update the firmware from the IDE". The board's VM is from another version: see When you change version.
- "Display: Invalid panel/bus configuration from boot.cfg." The board's display doesn't match the profile: the controller or the bus is not one the VM for its chip drives. Check the profile (see A board that is not listed).
If it keeps restarting
Open the serial monitor and look at what repeats before each restart.
- No JARU line shows up, not even "** Copyright (c) 2026 JARU Project.": the board doesn't carry the VM. It happens, for example, if you answer No in Run on the board, or with Upload Program on a board without the VM. Click Flash Firmware and then Run.
- The VM starts, your program begins and the board restarts: something in your program brings the VM down. A normal JARU error doesn't restart the board: the VM shows it and starts the program again. Fix the program and send it with Run. On the ESP32-P4 and the ESP32-S31, a failure like that doesn't restart the board: it leaves it stopped, with the error in the serial monitor.
- If the IDE can't open the port, because it comes and goes with each restart, start the board in download mode: with its BOOT button held while you restart it. Then click Run or Flash Firmware.
On the Waveshare ESP32-S3-Touch-LCD-2.8 and the JaruCade, Power.sleep() leaves the board without USB: see Supported boards.
Known issues
- Upload Program doesn't move the serial monitor aside. If it is open on the board's port, esptool can't open it and the write fails. Close it first with Close Serial, or use Run, which does move it aside. The same happens with Check Storage, Get Info, Generate and Get MAC.
- Run almost always asks about unsaved changes. With Flash Size on Auto detect, the default and what the examples have, Run and Flash Firmware write into it the size they read from the board, without saving it. The next Run then asks "…unsaved changes… Save changes before closing?", even though nothing is closing. Answer Yes.
- Cancel, in that question, stops Run without a word. The Output writes nothing more: nothing has been written to the board.
- Step 2 says "Flashing in progress…" while it reads the board. It writes nothing: it is the reading.
All the known issues of JARU, together, are in Known issues.