Tutorial Display and Draw: drawing on screen with JARU

This tutorial focuses on the graphical side of JARU: opening a screen, preparing a drawing surface, and building a small interface with the Display and Draw modules: text, cards, status bars, rectangles and circles.
The goal is not to build a complex demo. The goal is to learn the basic flow used later in games, IoT dashboards and graphical applications: open the display, clear the background, draw primitives and update the screen.
What you will build
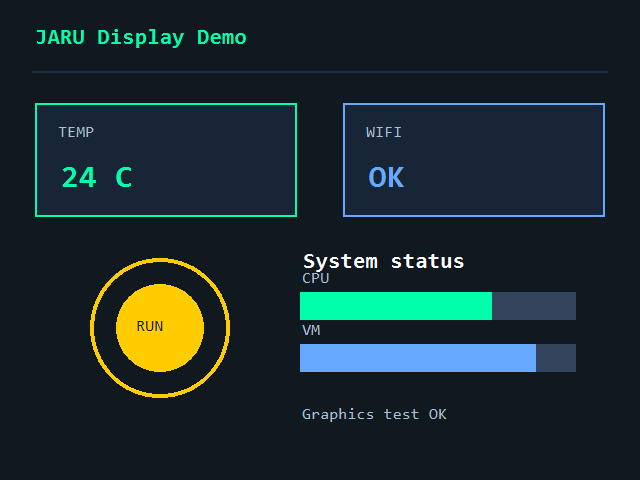
You will create a 320×240 screen with two data cards, a circular indicator and two status bars. It is a simple base for an IoT dashboard, a status screen or the initial menu of a game.
What you need
- JARU IDE installed on Windows.
- The
Displaymodule, available in JARU. - You do not need physical display hardware to complete the tutorial: you can run it in the Windows VM.
- (Optional) An ESP32 with a configured display to test the result on real hardware.
Step 1: Create the file
Open JARU IDE, create a new file called display_draw.aru and write this complete program:
use Display

const SCREEN_W = 320
const SCREEN_H = 240

Display.open(SCREEN_W, SCREEN_H)
Display.mode(2)

var draw = Display.draw
draw.colorBG = 0x101820

func DrawHeader()
    draw.text(16, 14, "JARU Display Demo", 0x00FFAA)
    draw.color = 0x203040
    draw.line(16, 36, 304, 36)
end

func DrawCard(x, y, w, h, title, value, color)
    draw.color = 0x172536
    draw.rect(x, y, w, h, true)

    draw.color = color
    draw.rect(x, y, w, h, false)

    draw.text(x + 10, y + 10, title, 0xA8C0D8)
    draw.text(x + 10, y + 30, value, color)
end

func DrawDashboard()
    draw.cls()

    DrawHeader()
    DrawCard(18, 52, 130, 56, "TEMP", "24 C", 0x00FFAA)
    DrawCard(172, 52, 130, 56, "WIFI", "OK", 0x66AAFF)

    draw.color = 0xFFCC00
    draw.circle(80, 164, 34, false)
    draw.circle(80, 164, 22, true)
    draw.text(68, 160, "RUN", 0x101820)

    draw.text(150, 126, "System status", 0xFFFFFF)

    draw.text(150, 136, "CPU", 0xA8C0D8)
    draw.color = 0x33445C
    draw.rect(150, 148, 138, 14, true)
    draw.color = 0x00FFAA
    draw.rect(150, 148, 96, 14, true)

    draw.text(150, 164, "VM", 0xA8C0D8)
    draw.color = 0x33445C
    draw.rect(150, 176, 138, 14, true)
    draw.color = 0x66AAFF
    draw.rect(150, 176, 118, 14, true)

    draw.text(150, 206, "Graphics test OK", 0xA8C0D8)

    Display.update()
end

DrawDashboard()
pause(5000)
Display.close()
Step 2: Open the display
The first part imports the module and opens a 320×240 graphical window:
use Display

const SCREEN_W = 320
const SCREEN_H = 240

Display.open(SCREEN_W, SCREEN_H)
Display.mode(2)
Display.open(320, 240) creates the screen. In the Windows VM, it opens a window with that size. On ESP32, the real resolution depends on the device display configuration.
Display.mode(2) enables double buffering. It is the most comfortable mode for interfaces, animations and games because you draw in memory and then show everything at once with Display.update().
Step 3: Get Draw and clear the screen
Draw is obtained from Display.draw. It is not opened separately:
var draw = Display.draw
draw.colorBG = 0x101820
draw.colorBG defines the background color used by draw.cls(). Here we use a dark blue so the interface colors have good contrast.
Inside DrawDashboard() the first call is:
draw.cls()
That clears the screen before drawing the new frame.
Step 4: Draw text, lines and cards
The DrawHeader() function shows three basic operations:
draw.text(16, 14, "JARU Display Demo", 0x00FFAA)
draw.color = 0x203040
draw.line(16, 36, 304, 36)
draw.text() writes text at a specific position. draw.line() draws a line between two points using the active draw.color.
The DrawCard() function reuses the same structure to create cards:
draw.color = 0x172536
draw.rect(x, y, w, h, true)

draw.color = color
draw.rect(x, y, w, h, false)
The last parameter of draw.rect() controls whether the rectangle is filled. With true you draw the card background; with false you draw only the border.
Step 5: Update the screen
At the end of DrawDashboard() you will find the most important call:
Display.update()
Without Display.update(), the content may remain in the buffer and not appear on screen. A good practical rule is to draw the whole frame first and call Display.update() once at the end.
Step 6: Test it in the Windows VM
- Save the file as
display_draw.aru. - Press Run or
F5in JARU IDE. - You should see a 320×240 window with the dashboard.
- Wait 5 seconds: the program calls
Display.close()and closes the window.
If you want the window to stay open indefinitely while testing colors or positions, change the ending to:
while (true)
    pause(100)
end
Step 7: Run it on ESP32
The same program works as a base for a physical display on ESP32, but one detail matters: on real hardware the display is initialized with the device configuration. Check that your boot.cfg or board configuration defines the driver, resolution, pins and orientation correctly.
For a first ESP32 test:
- Check that your JARU firmware includes support for your display.
- Connect the board over USB.
- Select the COM port in JARU IDE.
- Flash the project.
- If the orientation does not match, try
Display.orientation(1)afterDisplay.open().
Start by testing static interfaces like this before moving to animations or sprites. It is easier to validate colors, coordinates, text size and orientation.
Extra challenge
Modify the dashboard so it feels like a real project:
- Replace
TEMPwithBPM,HUMorBAT. - Add a third, smaller card.
- Change the background color with
draw.colorBG. - Replace
Graphics test OKwith the name of your ESP32 board. - Duplicate one status bar and try different widths to represent percentages.
Summary
In this tutorial you learned how to open a screen with Display.open, enable double buffering with Display.mode(2), get the drawing object with Display.draw, clear the screen with draw.cls, draw text, lines, rectangles and circles, and show the result with Display.update().