JARU IDE: rapid prototyping, proofs of concept, and ESP32 training

Developing for microcontrollers can be very rewarding, but it can also involve a lot of friction: configuring tools, connecting hardware, checking serial ports, flashing again and again, checking wires, adding debug messages, and repeating the cycle until the problem finally appears.
JARU IDE was created to reduce the distance between an idea and a first working version.
It is not meant to replace every existing tool or become the only way to program an ESP32. Its value is elsewhere: it offers a fast, visual, integrated environment for building prototypes, preparing proofs of concept, and teaching programming with fewer early obstacles.

From idea to prototype
When you are exploring an idea, you often do not need a definitive architecture yet. You need to check whether the logic works, whether the flow makes sense, whether a screen can show certain information, whether a sensor can drive a decision, or whether a small demo communicates the concept clearly.
That is where JARU IDE fits especially well.
The workflow is designed to start on Windows: you write JARU code, run it on the local virtual machine, test it with the GPIO simulator, debug it with breakpoints, and then move it to the ESP32 once the idea is validated.
The core idea is simple:
Write -> Test on Windows -> Simulate hardware -> Debug -> Deploy to ESP32
This cycle lets you move quickly without depending on the physical board from the first minute.
Testing without all the hardware ready
One of the most useful parts of JARU IDE is the Windows VM together with the GPIO simulator. You can run programs locally and observe how they interact with pins, LEDs, push buttons, analog inputs, signals, or virtual LED strips.
This is very practical when you are building a prototype and the physical setup is not ready yet. It also helps when you want to validate logic before connecting real sensors, displays, or actuators.
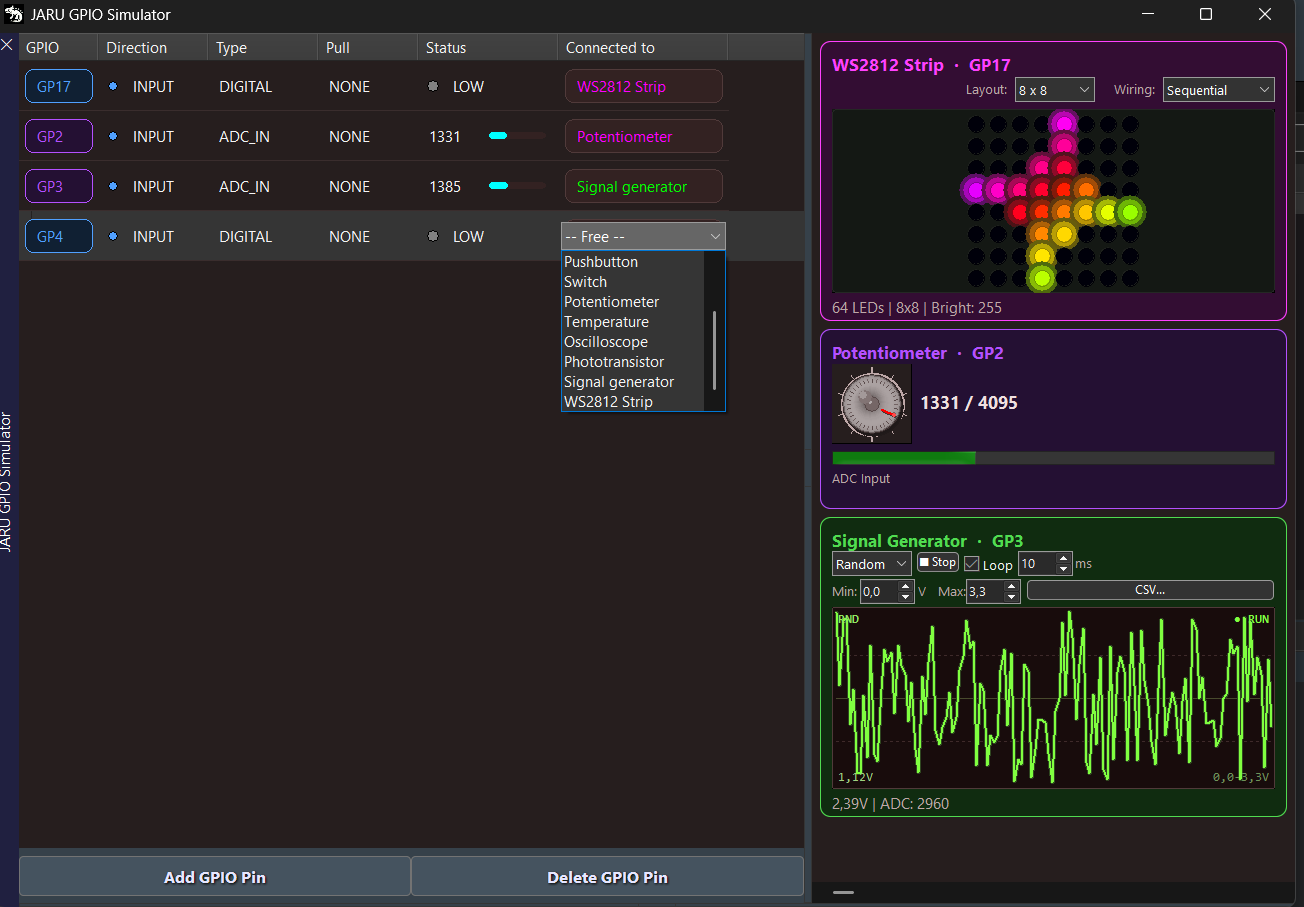
For example, you can test button behavior, simulate an analog reading, visualize a digital output, or check a WS2812 strip pattern without flashing on every iteration.
Then, when the behavior makes sense, you can move to the ESP32 with more confidence.
Visual debugging to understand what is happening
In many embedded projects, debugging often means adding print, watching the serial monitor, and inferring what happened. That method works, but it is not always comfortable, especially in training or when you are explaining concepts step by step.
JARU IDE includes visual debugging with breakpoints, step-by-step execution, and a Watch window for inspecting variables.
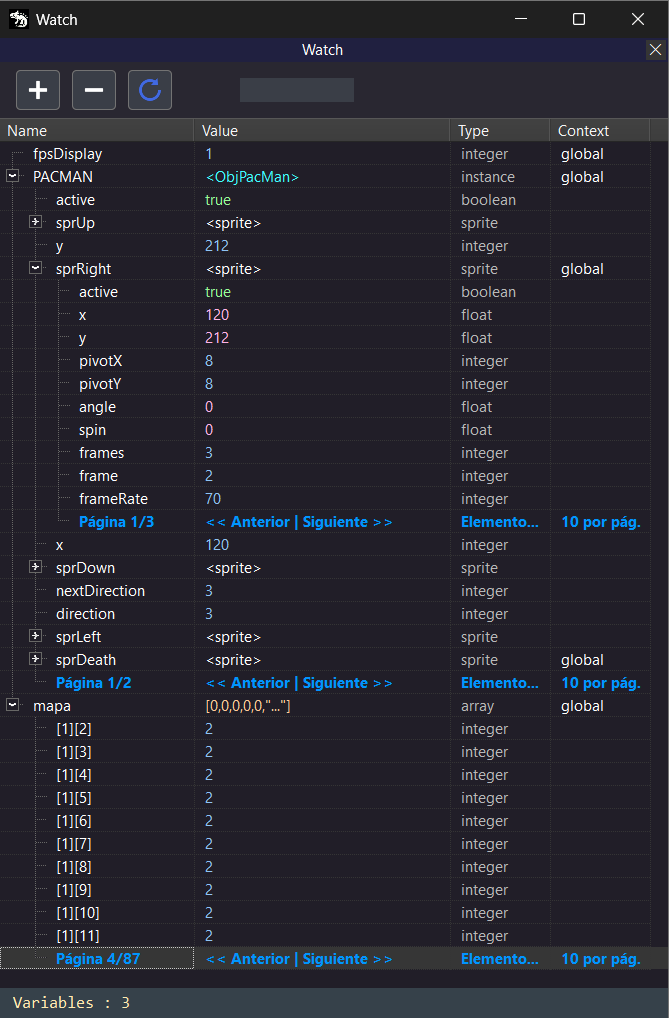
This lets you stop the program on a specific line, see the value of a variable, advance instruction by instruction, and understand how the internal state of the program evolves.
For prototypes, it helps you find errors earlier. For training, it is even more important: it lets you show what a loop, a condition, a function, or a variable is really doing without turning debugging into a black box.
A useful tool for training
JARU IDE also makes sense as an educational environment.
When someone is learning programming, IoT, or embedded systems, hardware can be a huge source of motivation, but also a source of frustration. An error may be in the code, the wiring, the COM port, the power supply, the USB driver, or the board configuration.
Starting in a local VM reduces that initial load.
The student can first learn concepts such as variables, functions, loops, classes, events, digital inputs and outputs, analog readings, or drawing on screen. Then they can move the same program to the ESP32 and see how something tested in the virtual environment behaves in the real world.
That gradual path makes JARU IDE useful for workshops, courses, demos, labs, and self-learning.
Proofs of concept with graphics, IoT, and resources
JARU IDE is not limited to writing code. It includes tools for graphical, interactive, and IoT projects: code editor, project tools, GPIO simulator, debugger, ESP32 tools, serial monitor, WiFi configuration, MQTT, displays, I2C drivers, and resource editors for images, sprites, or music.
This opens the door to many kinds of proofs of concept:
- dashboards for small screens
- IoT demos with MQTT
- tests with I2C sensors
- graphical interfaces for ESP32
- simple games and visual demos
- LED strips and matrices
- educational GPIO prototypes
- small projects with sound or music
The goal is to keep many common prototype pieces inside the same environment, without constantly jumping between external tools.

The creative side matters too. In a proof of concept, working logic is sometimes not enough: you may need a screen, an animation, a sound, background music, or a demo that communicates the idea in a few seconds. That is why JARU IDE brings resource tools into the project workflow itself.
Deploying to ESP32 once the idea is validated
Once the program works in the VM, the next step is testing it on real hardware. JARU IDE integrates tools for working with ESP32: flashing, serial monitor, WiFi configuration, MQTT, display, storage, and other device options.

This keeps the workflow focused: you write, test, fix, and deploy from the IDE itself.
For a prototype, that matters because it reduces iteration time. For a proof of concept, it helps you show something running on a real board without turning the process into a long chain of manual steps.
When JARU IDE makes sense
JARU IDE is especially useful when you want to move quickly, teach concepts, or validate an idea before investing more time in a definitive implementation.
It is a good fit for:
- rapid ESP32 prototypes
- IoT proofs of concept
- graphical or interactive demos
- programming and hardware training
- microcontroller workshops
- projects where simulation is useful before building the circuit
- experiments with sensors, displays, GPIO, MQTT, or sound
It is not meant to be the universal answer for every production firmware project. Its strong point is offering a short path between thinking of an idea, testing it, seeing it work, and bringing it to a board.
Conclusion
JARU IDE is designed to shorten the creation cycle with ESP32.
It lets you write code, run it in a Windows VM, simulate hardware, debug visually, and deploy to a real board from a single environment. That combination makes it especially useful for rapid prototyping, proofs of concept, and training.
If you want to try it, a good first experience is to start with a simple example like Blink, run it first in the Windows VM with the GPIO simulator, and then move it to the ESP32.