Music Tracker Tutorial: your first chiptune melody in JARU IDE

The JARU IDE Music Tracker lets you compose your game's music without leaving the environment, just like code or sprites. This tutorial walks through the whole process with screenshots: start from a template, type notes into the grid, tweak an instrument, listen to the result, and leave it ready for your program to play.
What you will build
A short melody with four tone channels and one noise channel, saved inside your project and compiled into a resource the JARU VM can load. It sounds like this:
That is not a speaker recording: those are the exact samples the JARU sound engine produces.
What you need
- JARU IDE installed (installation guide).
- An open project. If you don't have one yet, the Projects page explains how to create it.
You don't need music theory or a MIDI keyboard: you type the notes on your computer keyboard.
Step 1: Open the Music Tracker
On the Home ribbon tab, click Music.

The Music Editor opens, empty if the project has no songs yet.
Step 2: Create the song from a template
Click New on the editor toolbar.

The IDE offers four starting points: an empty song, a basic 4/4 beat, a chiptune lead riff, and a battle theme. Pick Chiptune lead and click OK.
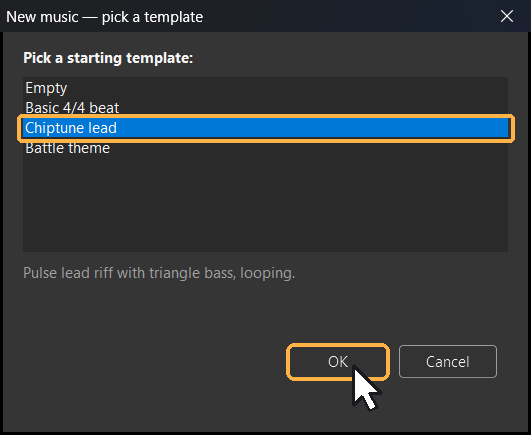
Starting from a template saves you the tedious part: it already defines the instruments, sets the tempo, and gives you something that plays from the very first moment. Starting from Empty is perfectly valid, but then you have to build the instruments by hand before you hear anything.
Name the file. In this tutorial it is called Melody.

The IDE creates Melody.jms inside your project's Music folder and adds it to the explorer.
Step 3: Recognize the five areas
The editor is split into five areas, and it is worth identifying them before touching anything.
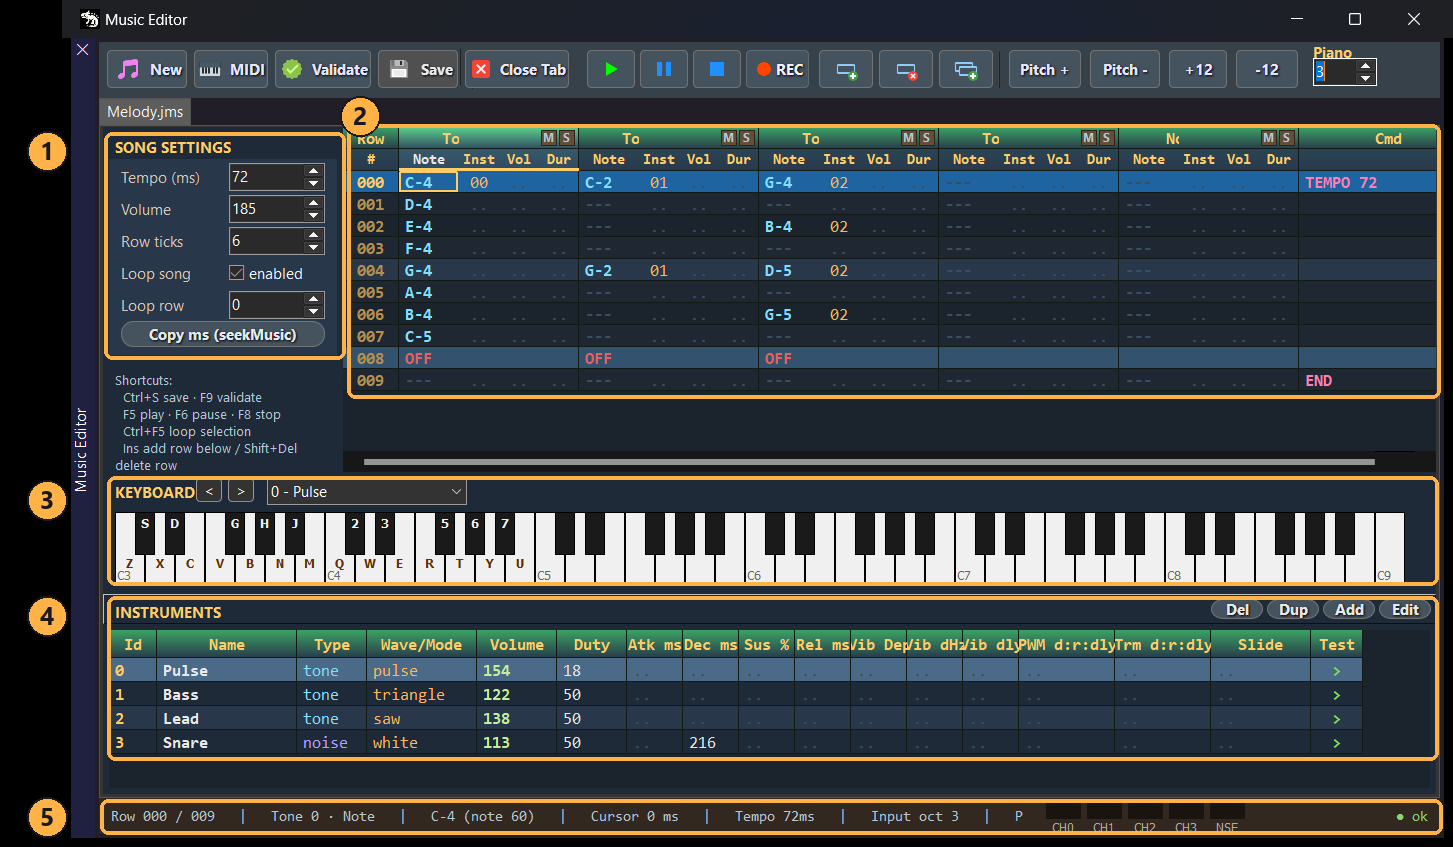
- Song settings. Tempo in milliseconds, overall volume, how many ticks each row lasts, and whether the song loops.
- Pattern grid. The heart of a tracker: one row per time step, one block of columns per channel.
- Virtual keyboard. Shows which computer key maps to each note.
- Instruments. The table of sounds the notes can use.
- Status bar. Where the cursor is, what note sits under it, the tempo, and the VU meters for each channel.
Right below the settings there's a shortcut list worth keeping in mind: F5 plays, F8 stops, F9 validates, Ctrl+S saves, Ins adds a row, and Shift+Del deletes it.
Step 4: Read the grid
Music reads top to bottom. Each row is one moment in time, and each channel takes four columns.
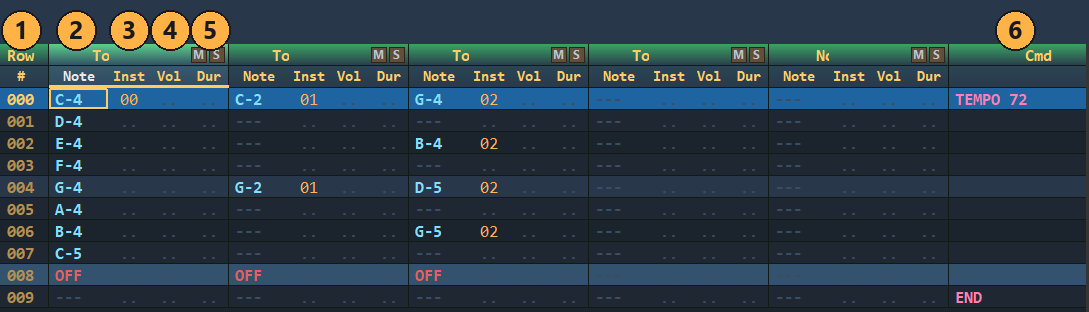
- Row number. The time step. With
Row ticksat 6 and the tempo at 72 ms, each row lasts 432 ms. - Note. The note, such as
C-4.OFFcuts whatever was playing. - Inst. Which instrument from the table plays it.
- Vol. The volume of that particular note.
- Dur. How long it lasts, when you want it to differ from the default.
- Cmd. Song commands. Note the
TEMPO 72on the first row and theENDon the last one, which marks the end of the song.
There are four tone channels and one noise channel for percussion. The M and S boxes in each header mute that channel or solo it, which is the quick way to isolate one line while you edit it.
Step 5: Enter notes
To type with the keyboard you first have to turn on recording mode: click REC. The status bar confirms it.
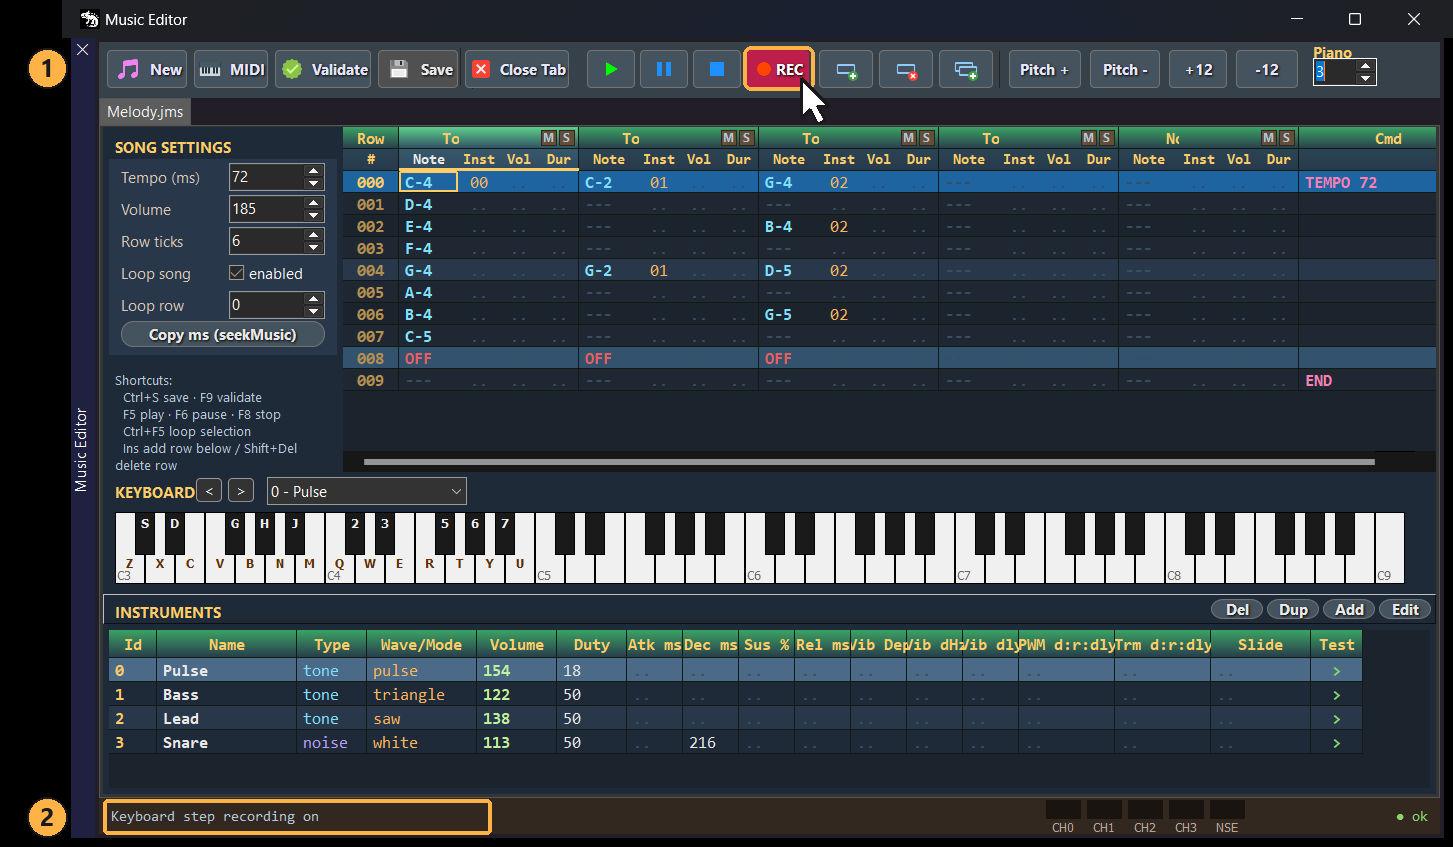
Now single-click an empty cell in the Note column and press a letter. The virtual keyboard from step 3 has the map printed right on the keys: the Z X C V B N M row plays C D E F G A B in the base octave, the Q W E R T Y U row does the same one octave higher, and the black keys live on S D G H J and 2 3 5 6 7.
Every note you type moves the cursor down one row, so you can chain a melody without touching the mouse.
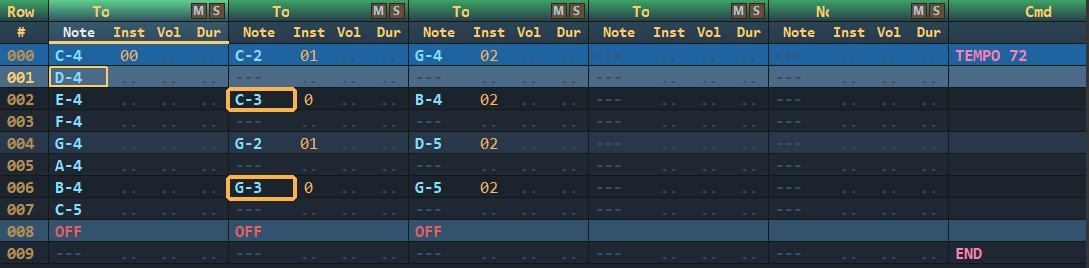
Here, two notes have been added to the bass channel, on rows 002 and 006, so it alternates between two octaves:
If you click a cell that was already selected, the cell's text editor opens and the letter goes in literally, as a character. The cell keeps an invalid value, underlined in red:
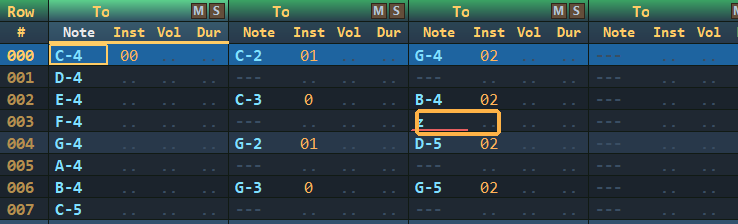
Fix it by selecting the cell and pressing Del, which empties it. One click selects; two open the editor.
Two different numbers live in the status bar: Input oct is the octave you type in, and Piano view is the one the virtual keyboard is showing. The Piano selector on the toolbar only moves the view; it doesn't change what gets typed. If a note comes out an octave higher than you expected, check Input oct, not the keyboard.
Step 6: Validate
Press F9 at any point to check the song. If something is wrong, the IDE tells you how many cells fail and leaves them underlined in red so you can find them.

When everything is right no dialog appears: the status bar reports that the song is valid and how much space it takes once compiled.

That is the size of the final resource. A complete melody fits in a few hundred bytes, which is exactly the point of a tracker over an MP3.
Step 7: Tweak an instrument
Select a row in the Instruments table and click Edit.
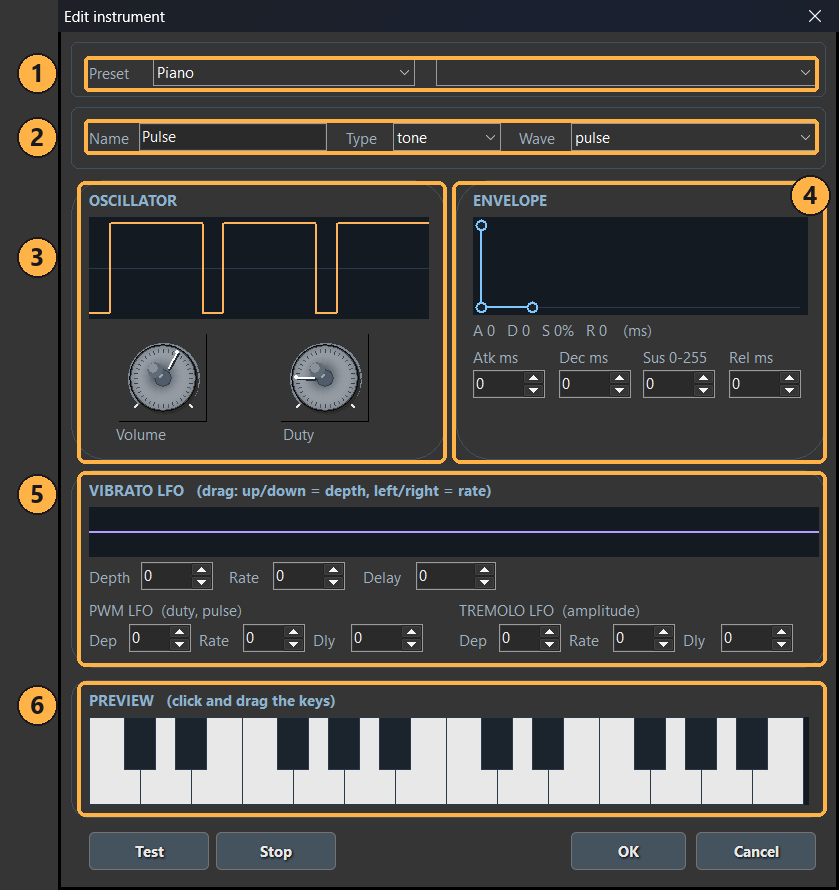
- Preset. A starting point taken from the General MIDI instruments.
- Name, type, and wave.
tonefor notes andnoisefor percussion; the wave can be square, triangle, saw, pulse, or sine. - Oscillator. The instrument volume and the
duty, which changes the color of the pulse. - Envelope. Attack, decay, sustain, and release in milliseconds, with the graph next to it.
- LFOs. Vibrato, PWM, and tremolo. The vibrato one is set by dragging across its strip: up and down changes depth; left and right changes rate.
- Preview. A keyboard to try the instrument right there, next to the Test and Stop buttons.
One small change that makes a big difference: give the Pulse instrument some release. Type 120 into Rel ms and the note stops cutting off abruptly when it is released.

Click OK to go back to the song.
Step 8: Listen to the song
Press F5. The row currently playing is highlighted in green and the VU meters in the status bar move channel by channel.
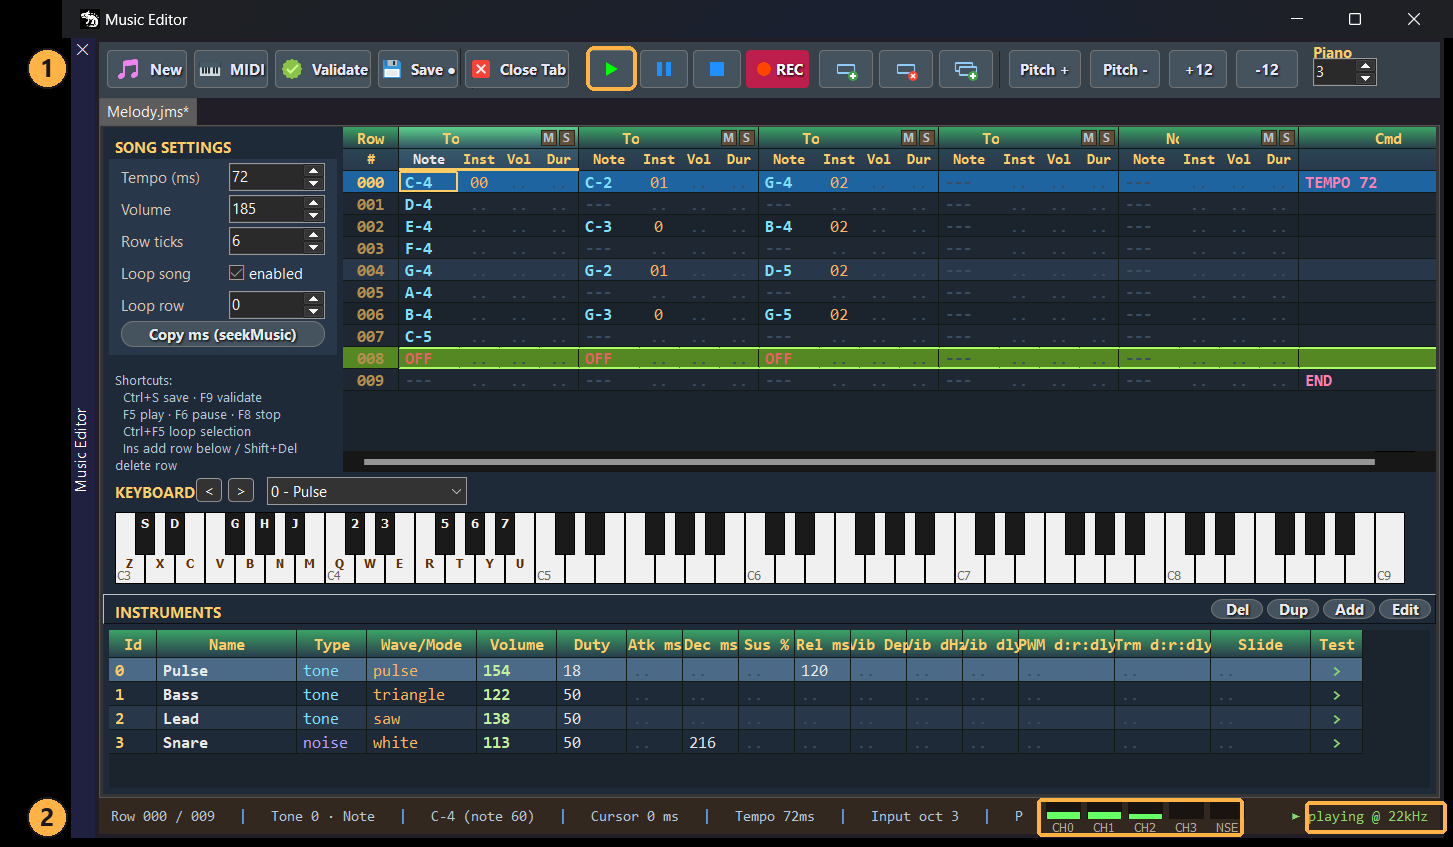
- The play button, the same as
F5.F6pauses andF8stops. - The VU meters and the playback indicator, showing the sample rate it is playing at.
If you want to repeat just one section while you tune it, select those rows and press Ctrl+F5.
Step 9: Save and build
Save with Ctrl+S. The asterisk next to the tab name disappears when there are no pending changes.
When you build the project, the IDE turns your Music/Melody.jms into Build/Flash/Music/Melody.jmu. The .jms is the editable file you keep working on; the .jmu is the compact binary the VM loads. You never have to generate it by hand.
Step 10: Play it from your game
With the resource compiled, playing it takes just a few lines:
use Sound

Sound.init()
Sound.setMusicVolume(185)

if (Sound.loadMusic("Music/Melody.jmu")) then
    Sound.playMusic(true)
end
The true in playMusic turns looping on. To stop it, Sound.stopMusic().
Set the level with Sound.setMusicVolume rather than raising the volume of each note in the grid. That keeps the balance between channels and lets you duck the whole music track when a sound effect plays.
Extra challenge
Now that the song plays, try making it yours:
- Change the notes on the melody channel and leave the bass alone.
- Mute channels with M to hear each line on its own.
- Drop
Tempo (ms)to 60 and raise it to 90 to feel how much the character changes. - Add percussion on the noise channel with the
Snareinstrument. - Duplicate an instrument with Dup and change its wave from
pulsetosaw. - Open the other three templates to see how they are put together.
Summary
In this tutorial you created a song from a template, learned to read the pattern grid, typed notes using REC mode and the computer keyboard, validated the song with F9, tweaked an instrument envelope, and played it from your program with Sound.loadMusic and Sound.playMusic.
To go deeper, see the full Music Tracker reference — the .jms format, the command table, and MIDI import — and the Sound module reference.